 I have
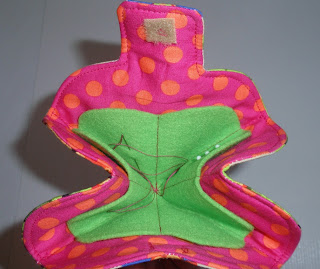
 Kelli, a friend from my modern sewing group, has THE cutest little needle case that I have been coveting, so on Sunday when we got together she suggested I trace it and make my own. Of course the project took about 5 times longer than I expected, but the result was worth it.
 All I needed was an 8" square of outer fabric, 8" square of lining fabric, an 8" square of batting, and a 7" square of coordinating felt. I made a pattern using regular printer paper from the tracing I took of Kelli's case, but had to make another because the first one wasn't symmetrical. A little cutting, sewing, pressing, and top-stitching and voila - a lovely new needle case!
 The sides fold in to make it collapse, and a velcro tab keeps it closed when not in use.
 I added a button to raise the cuteness factor, and now it's complete!
 The fabrics used are Kaffe Fassett Kirman in Grey, Kaffe Fasset Spots in Fuschia, and some screaming neon green felt that I had on hand.
So now I still have all the unfinished projects that I had when the day started, but one of the projects on my mental to-do list is finished! That still counts as a finish, right?

Your needle case is very cool. I have the same philosophy as you.... I clear my head with a silly project and then forge on! I've enjoyed looking through your blog.
ReplyDeleteI love this clever needle case...nice to keep the different sized needles/pins separate. Thanks for posting instructions to hopefully save me from spending five hours on my first one! I've enjoyed your blog, LOVE your Italian tiles quilt :-)
ReplyDeleteI love this needle case, but mine totally asymmetrical. If you still have the pattern would you mind emailing it to me @skmarkham3@rmail.com. Susan Markham
ReplyDeleteHi Susan! I'm so sorry to say that I cannot locate the pattern I used. My sewing room is a disaster right now, and I'm sure it's in there somewhere, but I just can't lay my hands on it. Grrr. My first attempt was completely asymmetrical, so I just folded my pattern paper into eighths (like you would to make a paper snowflake) and trimmed the outer curve thru all the layers so they would all be the same. I hope this helps. When I find the pattern, I'll be sure to photocopy and send it. Thanks!
DeleteHere's a link for a tutorial for a very similar one of these http://sewprimkhris.blogspot.com.au/search/label/Tutorial%20-%20Needlecase
DeleteHugs
Naomi