Block #1 is the largest (36" finished) and that's where the BOM program started - go big right outta the gate! My center red and white section on point finishes at 12" square; adding the blue triangles brings the block center to 18" square. The four outer squares are 9" and the flying geese sections are 9" x 18". I'm quite sure this is the biggest quilt block I've ever made! (If you're making this quilt too and would like some helpful cutting info, make sure you read all the way to the bottom of this post.)
The background here is a long-hoarded Paris street map print from the "Passport" line by 3 Sisters for Moda. I'm planning to make this a very scrappy quilt with many different prints in my four main colors, but I'll use this Paris map print in lots of blocks because I love it so much :)
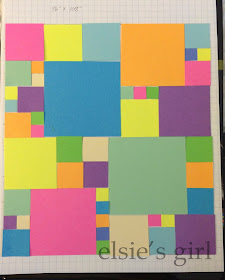
My planning for a king sized quilt started with graph paper and scale cut cardstock pieces. I used a 12:1 scale for cutting the cardstock, so the 36" block above is represented by a 3" square of cardstock.
Fortunately all of the block sizes in this quilt pattern are divisible by 3, so I assigned each square on my graph paper chart to be equivalent to 3" in real life. By slightly upsizing a standard king sized quilt measurement to 96" x 108", both the height and width dimensions of my planned quilt are divisible by 3. Whew - first step of quilt math done!
With the 96" x 108" grid marked on my graph paper, I started filling it with cardstock pieces to determine a layout. After several iterations (and advice from a design-savvy friend) I arrived at this final layout.
My king-sized version of the Modern Building Blocks quilt will contain:
- (2) 36" blocks
- (2) 30" blocks
- (2) 24" blocks
- (5) 18" blocks
- (16) 12" blocks
- (25) 6" blocks
That's a total of 52 blocks! I've been plugging away at this little by little over the past 12 months, but if I have any hope of draping this quilt over my bed in the Christmas/Winter season of 2016-17 I need to buckle down and finish the top soon. I've got 23 blocks sewn so far, which I'll show you in posts to come. While most of my blocks are from the published pattern, there are also a few designs that I pulled from other sources.
The following modifications and tips helped me get the correct sized block the first time. I hope you'll follow along with my progress :)
Pattern cutting modifications for Block 1 - These changes allow you to trim sections to size as you sew which leads to better accuracy.
Pattern cutting modifications for Block 1 - These changes allow you to trim sections to size as you sew which leads to better accuracy.
- B fabric: cut (8) 4" squares
- D fabric: cut (2) 4" squares
- E fabric: cut (2) 10.5" squares
- F fabric: cut (4) 10" squares
Block section trimming instructions - trim individual sections as you go to make sure you end up with a 36.5" unfinished block.
- Center square A/B trim to 6.5"
- B/D HST units trim to 3.5"
- C/D flying geese units trim to 3.5" x 6.5"
- A/B/C/D unit trim to 12.5"
- A/B/C/D/E unit trim to 18.5"
- F/G flying geese units trim to 9.5" x 18.5"


No comments:
Post a Comment
Thanks so much for stopping by and reading a little bit about me and taking the time to comment! Have a wonderful day!