Pages

Showing posts with label SewMod. Show all posts

Friday, October 2, 2015

fall coffee dates

Last fall I started going to Starbucks every Monday morning with Thing 2 before she went to school. It was a nice way to start the week, and we had many great conversations over our mochas, peppermint hot chocolates, and chai tea lattes. We made it there every Monday morning throughout her entire senior year of high school.


We've decided to continue the tradition this year. I visit the usual location near my home, and she goes to the one closest to her college dorm. We chat on the telephone instead of face-to-face, but it's still a great way to start the week and stay connected :) This week I brought along a book to fill the time while I waited for her. (By the way this a very good story - one of the main characters works at a quilt shop and actually lives over the shop with her young daughter!)

I really love the look of the new fall Starbucks cups, and as I sat there reading and enjoying my hot tea I thought, "these fall cups could really use a matching coffee cup cozy!" Since I knew the perfect fabric scraps were waiting in my stash, I immediately started cutting once I was back at home. My friend Lorrie created and published the fantastic pattern and tutorial on her blog at SewMod.


My button stash is not so well stocked (sadly), so once all the fabrics were cut I headed out to purchase some fun buttons and the elastic hair ties needed. Shopping for those supplies took longer than actually sewing the cozies!  Here they are all sewn and ready to go!


They will fit all sizes of Starbucks hot beverage cups - tall, grande, and venti.


I buttoned them all and stood them upside down so you could see the fun lining fabrics too :)


Thing 2 really likes the one on the left (so I'll be sending it in her next care package), while I'm pretty attached to the one on the right. I haven't decided what to do with the other five - probably give them to my coffee loving friends!


You should check out Lorrie's tutorial and make some for yourself and your friends! Then make a coffee date with someone you love :)


Tuesday, January 29, 2013

spools progress

It's been a few weeks since Lorrie and I have been able to work on our spool quilts. Life and the holidays just seem to take over sometimes, right?

But we did manage to get in one last sewing session before Christmas where we were able to finish all the spool blocks and get the centers of our quilts together...


41 spools arranged in 9 rows. I just realized that this photo is upside down - the sideways green spool at the top left is actually the bottom right part of the quilt center - whoops! A green applique floral vine will be spooling off of this block and flowering clockwise around the quilt border when all is finished.


We've elected to machine applique all of the flowers and vines (time savings!) as we'd like to finish these tops before spring. Lots of tracing applique shapes is what's up next for us, and that's our "homework" to finish before our next session in early February.

So many projects - so little time!!

Sewing time to complete 82 spool blocks and 2 quilt centers: 8 hours
Grand total from 4 sessions: 33 hours


**You can read more about this project by entering "spools" into the search function on the right sidebar.

Thursday, December 6, 2012

spools progress

Yes - Lorrie and I are making spools! Our last sewing session earlier in November yielded quite a bit of progress...


We sewed our remaining eight strip sets giving us a total of 36 sets. We each need 41 pieces measuring 3.5" x 4.5" for our spools. Due to some over-zealous strip cutting on my part, we actually had enough strip sets made to make 4 spool quilts! Our extras have been stashed away for another project - we're not sure what project - but they will be used for something!

We then sewed the side pieces onto each colorful spool, pressed them, and called it a day. Here are some samples of what we accomplished. Pink spools...


And teal spools...


And now it's December and we got back to business today! It was a very tedious day of sewing - making 82 spool tops and bottoms for each of us. Yep, that's right. We spent the entire sewing time today adding these little triangles to the ends of the brown strips.


Over three hours for each of us sewing and pressing. The most boring part of the project so far. Mind numbing as it was, thank goodness we were working on it together or else it might have gone straight to the WIP pile (or out the window!) But we plodded through, and next week we'll be on to a more fun task - actually finishing the spool blocks!

Project hours from our November session:
Sewing strip sets - 2 hours
Cutting spools - 2 hours
Sewing blocks - 3 hours

Project hours from today:
Sewing spool tops and bottoms - 7 hours

Grand total from 3 sessions: 25 hours to date

To see more about the beginning of this project read this post.

Thursday, November 1, 2012

combined effort

Today Lorrie (from SewMod) and I started a new project together! We're only going to work on it during our sewing days together, and in the end we'll each have our own quilt - each one different but both very similar.

Over the past week I've cut 200 or so of these...


And today the two of us turned 75% of those strips into these sets...


Pretty, huh?

And the next step will be to cut all the finished sets into these...


Any guesses about what they might become?


And just for fun I'm keeping track of hours the whole project takes us. So far:

Cutting strips: 4 hours
Sewing strip sets: 7 hours today with about 2-3 hours remaining

Monday, April 30, 2012

more twinkling

My good friend Lorrie at SewMod had me over for a sewing fun day last week, so I was able to crank out 10 more of my Twinkle blocks. My tally is now 14 done, 28 to go! Each block seems to go together faster than the previous one, even with the initial partial seam required from this pattern.

Here's a grouping of pink blocks:


Some magenta/red blocks:


And lastly some purple ones:


Have any of you reading made this pattern before? I'm not a fan of repeating the same block construction forty-two times, but since every single fabric is different, I haven't become bored yet. I've stuck with my plan of only working on these blocks when I'm away on a sewing outing, so that probably also contributes to the lack of boredom.

Lorrie and I are planning another work day this week, but I'd really like to make some headway on my SewMod row quilt, so I think I'll tackle that. I've got some pretty elaborate machine applique borders planned, and the shapes are already traced to the fusible webbing. All I need to do is buckle down and commit already to the fabrics to use. Having Lorrie around always ramps up my ability to make quick decisions. I'm not sure why that is, but maybe it's because she's the speediest quilter I've ever seen! You should head over to her blog and see the fun quilt she's making now from a Cluck, Cluck, Sew pattern with Art Gallery and Kona solid fabrics!

And I apologize if this posts with double spacing between everything. Sometime since my last post Blogger has changed, and I can't quite figure out how to insert single-line spaces between photos and text paragraphs. Everything I used to do produces no spaces, and inserting HTML break codes produces double spaces. If you've had this problem too and solved it, please tell me how!

Tuesday, May 24, 2011

rainbow spools

The end of the school year is quickly approaching, and the deluge of associated activities is swamping our household. But after a couple more hectic weeks we'll be in the midst of relaxing summer bliss.

But until then, it seems there are a million things to get finished. Including my SewMod row quilt. I've managed to devote some hours to it this week, and now all my lovely rows are sewn together! I added a small strip of the Kaffe Roman Glass in Red between each row to unify everything.


I'm going to add a row of appliqued vines and flowers to each side of this quilt before adding final sashing and borders. It's all planned out in my head, and hopefully I can make the reality as exciting as what's in my mind :)

A quilt like this with so many contributors needs an out-of-the-ordinary label, so I've made a spool block for each person to sign! And of course, I used the color spectrum (if somewhat loosely) to assign a color to each spool.


The row of spools on the quilt back will be book-ended by the two red spools. I took the liberty of writing out one of the red labels already... another visual reminder of my deadline :)


Here are a couple of close-up shots of all the spools. All the colored fabrics came from my scrap bins (notice all the Kaffe bits), and the others are Kona White and Kaufman Quilter's Linen. I adapted Edyta Sitar's spool pattern from her book Friendship Strips and Scraps to make a larger sized spool to accommodate the center signature area - these measure 6" x 8" finished.


I've definitely never spent this much time and effort on quilt labels, but I think they turned out so ding-dong cute! I can't wait for my friends to sign these next week and get this quilt one step closer to being completed... ON TIME :)

Tuesday, February 22, 2011

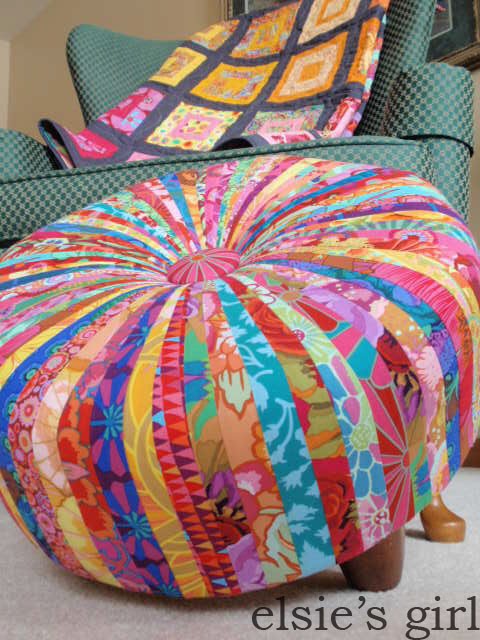
presenting the tuffet!

** November 2014 Update - The pattern we used to make this tuffet is simply called "The Tuffet" by Myra Mitchell. You can purchase this pattern here from Lorrie at SewModDesigns on etsy.  Vicki at Accio Fabric also wrote a post about our tuffet making party which has a photo of what the tuffet bases look like before we covered them with the colorful pieced tops. You can view that post here. I hope this helps! **


Sunday's project day was a success!! Here's my tuffet in all it's Kaffe glory. What do you think?


The center fabric-covered button...


The lovely stained and polyurethaned feet (thank you dear husband!)...


In it's new home with the Kaffe Crayon Box quilt...


Now I'm not gonna lie to you, this project was very labor intensive. Lots of foundation piecing of the (64)  2 1/2" jelly roll strips to muslin patterns (eight sections just like this one)...


There is a LOT of prep work (thanks Lorrie!) involving cutting the plywood base, hammering in the T-nuts to hold the feet, and cutting the two layers of 3" thick foam. After stapling a layer of Warm and Natural batting over the plywood and foam base, we then centered and 
s - t - r - e - t - c - h - e - d
the foundation-pieced cover over the batting...

Lorrie, Me, and Andrea working as a team!
stapled that layer down, and threaded the upholstery needle through the bottom...

Lorrie and Andrea putting the button on Andrea's tuffet.

then pushed the button in while simultaneously pulling the string out the bottom while simultaneously pushing against the base. Whew!! Do not try this at home by yourself!!

Lorrie, Andrea, and Vicki really putting their muscles into it!
Lorrie over at SewMod organized this entire project and guided us through every step. Thanks for all the motivation, legwork, and assistance, Lorrie - I never would have attempted (let alone finished) this on my own!

In fact, while I was elbow-deep in foundation-piecing, I declared that I would never make another one of these tuffets.  But now that I've had a few days to admire it's loveliness, the memory of the pain is slowly ebbing from my mind... kind of like after birthing a baby - you swear you'll never do it again, but then the baby paralyzes you with it's cuteness and you forget all that pain...

I guess I've been paralyzed by it's cuteness :)


Oops, I almost forgot to show all the finished work!  Clockwise from the bottom left:  Andrea's Fandango tuffet, Lorrie's Soul Blossoms tuffet, and Vicki's Amy Butler assorted tuffet.

Wednesday, February 16, 2011

and now for my next trick

I'll be attempting to turn this...
into a tuffet like this...
Workshop day for my SewMod group is this Sunday, and the tuffet is our project.  Check back next week for an update (and hopefully a finished tuffet!)

I hope you are all having a great week.  There is a lot of melting happening here in the Midwest.  It almost makes me believe that spring will soon be upon us!

Thursday, February 10, 2011

the big reveal, part 1

Last night was our swap meeting for the Row Quilt Exchange in my SewMod group - the culmination of a challenge that started last June.

Here's a shot of all the rows I made for the other members...


Each member made one unique row for every other member. I made flying geese for Pattie, flowers for Vicki, log cabins for Kelly, pinwheels for Paige, flying geese (again) for Jennie, Dresdens for Lorrie, and baskets for Andrea.

And these are the rows I received last night! They are up on the design wall, and I just can't get over how wonderful they are all together!


We each provided the other members with a "focus" fabric fat quarter to aid in selecting colors for the rows we were assigned to make. This is my focus... Kaffe (of course) Roman Glass in Red.


Some close-ups of what I brought home:

Log cabins made by Kelly...


Dresdens from Lorrie...


Flying geese made by Pattie...


Paige provided these pinwheels...


A row of flowers (and a bird!) from Vicki...


And baskets from Andrea...


I going to think long and hard about how I'll finish this quilt. Maybe a tiny border of turquoise around each row to separate them? The row I'm supposed to make for myself is stars, so maybe I'll do an all-around border of wonky stars? I really want the showcase to be the superior workmanship and creativity of my friends, but hey - it's Kaffe's fabric - so I don't think anything sedate will do. It's a fine line, and I'm going to need to study these beauties for a while longer before making a plan.

Right now I'm content to just sit in my chair and enjoy the view :)

Thank you, thank you, thank you to all my SewMod friends! I couldn't be happier!

Tuesday, January 11, 2011

are they log cabins or hexagons?

It's getting near to deadline time for the SewMod row quilt challenge (February 1- yikes!). I made a great start last fall and got 4 of 8 finished and then the holidays took over. So today I grabbed some fabrics and started cutting strips for Kelly's log cabin row. Her focus fabric is a black and white swirl - the squares in the upper left corner. I have several scraps from my month in the Fresh Modern Bee, so I decided to add them in for some color punch.

I found the free pattern for this paper-pieced log cabin variation at www.quiltersnewsletter.com late last year**. The row needs to be 40" finished and these blocks are about 7" wide so I've got some sashing to do, as well as some corner triangles - I'm thinking the black and white swirl again for corners. We'll see how it all comes together.


Hope she likes them!

** I can't seem to locate the exact URL for this pattern right now. I'll post an update later if I find it.

Monday, September 13, 2010

Glam Garden Baskets

I love it when I finish a project on a Monday! It makes me think the rest of the week is going to be so productive :) Last week I started on these basket blocks for my SewMod group Row Quilt Challenge.


The row is for Andrea, and her focus fabric was Glam Garden in Summer from Josephine Kimberling for Robert Kaufman. I love all the bright pinks, orange, turquoise and yellow in this print!

My row assignment for Andrea is blocks. Now I've never sewn a basket block that wasn't appliqued, but I found this cute block pattern here and it was FREE! I modified the instructions a bit (mostly the way the half-square triangles were constructed) to make it easier, and I think it turned out quite pretty. Not perfect... but fresh, modern, and pretty.


The block name is "Basket of Chips", and while Andrea is hands-down the healthiest eater I know, I also happen to know that she indulges in potato chips with dip during certain football games. So I figured the block was appropriate :) Hope you like your row, Andrea!

P.S. I also finished all my Kaleidoscope hexagons last week, so now I am ready for part 2 of the class taking place at the end of the month. So this is what it feels like to be ahead of schedule... I could get used to this :)

Wednesday, August 4, 2010

Sneak peek

It might be that I am breaking some rules here, but I just had to show you a bit of these projects. My real-life sewing group, SewMod, has organized a row-quilt challenge. Each member makes a 40" row of a different specific block for every other member. We're supposed to be doing one row per month (in order to evenly space the work between the months of June 2010 and February 2011) but since procrastination is one of my dominant personality traits, I'm a little behind... but only a little.

We each provided all the members with an "inspiration" fat quarter of fabric in order to help with color selection. I decided to jump in with the pinwheels row first since I love, love, love that block. The inspiration fabric for this row is the green and white print on the far right. Can you believe that I had the blocks all together before I located this sashing in my stash? In the words of the multi-tentacled Davey Jones (Pirates of the Caribbean), "How fortuitous!!"


Moving on to the Dresden Plate row (another favorite block)... but wait, I have to make Dresdens with Halloween fabric? Huh? The inspiration fabric here is the center circle of black, purple, and neon-green eyeballs. Well, they turned out pretty darn cute, I must say...


I couldn't just keep these to myself until February, now could I?

LinkWithin

Related Posts Plugin for WordPress, Blogger...