Pages

Showing posts with label Dotty Star. Show all posts

Monday, June 18, 2012

Dotty Stars finished!

My Dotty Star is quilted and bound!


I chose an edge-to-edge quilting design (also known as pantograph) called "Petal Pushers" in a very pale pink color. My long-arm quilter has a giant array of patterns to chose from, and I wanted something flowery but not too dense because the front is busy enough already! The backing is primarily the flower dots on blue print you see here with a white on white strip right down the middle. I had to make-do with what was left on the bolt of those flower dots. Quilt backing fabric on clearance - gotta love that!


The binding is an irregular white dot on black print. Something about the uneven spacing of these dots seemed a better fit than dots in a grid pattern. And of course, it just had to be a print with dots!


It's now hanging in its new habitat - my sewing room! I took down my Mary Engelbreit New York Beauty quilt and placed it on my new quilting ladder. It feels pretty good to have enough quilts here at my house to be able to rotate them.

If you'd like to see any details about the pattern I used for this quilt and some construction tips and tricks, you can read all about it by clicking on "Dotty Stars" in the Labels section in the right sidebar.

Monday, February 27, 2012

Dotty Star borders

Over the weekend I chose a new layout for my nine Dotty Star blocks. The layout I posted last week felt like there was too much blue and not enough yellow. But this new one feels more sunny overall :)


The borders were cut and placed to correspond with the main color of each block. So now with the 3" border all around, my quilt top size is 60" x 60".


I purchased a black with white dots fabric last week for the binding, so now I've just got to find a backing and decide how to quilt it. I'm pretty set on sending it out to be quilted, but I'm not sure if I'll have her do an all-over pattern or something more custom. The quilt photographed with the pattern has the stars ditch-quilted with various circular motifs quilted in the background square spaces. Any suggestions for me?

Friday, February 24, 2012

9 out of 9 finished!

I am just floored by what can be accomplished when I stick to one project at a time! This week I managed to crank out the last five of my Dotty Stars, and here they all are together on the design wall...


I'm not sure if this will be the final layout; the borders need to be cut and placed around the perimeter before I decide for sure. I've got a close-up shot of each of the five new blocks for you next, but be sure to scroll all the way to the end of this post for some helpful tips should you decide to make your own Dotty Stars quilt!


Tips and Tricks for making your own Dotty Stars Quilt

Nine stars provides quite a bit of practice, so I made a few notes to help you with yours :)

1. I am a big believer in Mary Ellen's Best Press spray. There are tons of bias edges in these quilt blocks, so do yourself a favor and stabilize all that fabric with Best Press or another starch-like product before cutting anything.

2. Make it easy on yourself and just cut a mess of your scraps into 3" squares. You'll need a ridiculous amount of HSTs cut from 3" squares to make this quilt.


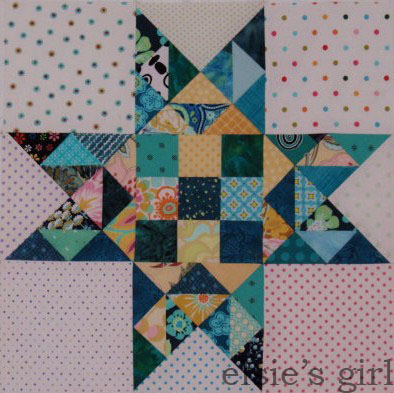
3. For each star you'll need 28 dark HSTs and 20 light HSTs cut from your 3" squares, and 9 total 2.5" squares - 5 dark and 4 light. Cut these center squares from your pile of 3" squares after you've made the triangle sections.


4. Add some yellow to each block to pull everything together in the end. I wish I had added some black and white to each one as well - I think it would have given more contrast within each star.

5. When sewing your small triangle units (the point sections of each star) use the full 1/4" seam allowance, but when sewing the center four patches use a scant 1/4" seam. The first couple of blocks my pieced triangle sections were always bigger than the 4 squares at the corners and the center 9 nine patch; the only way I could fix this (since all my corner squares were already cut) was to vary the seam allowance slightly between the triangle and square sections.

6. When sewing the main nine sections of each star block together, press those seams open. For all other seams within the block sections, press according to the pattern instructions.

I used all scrap fabrics for the colored portions of each star, but I did purchase 12 different 1/4 yard cuts of dots on white to use for the backgrounds. It doesn't seem like I used up that many of my scraps. My friend Lorrie thinks that scraps multiply once you start cutting them, and it sure seems that way here. I feel like I've still got enough HSTs cut to make another quilt. What should I do with them? It's so hard to throw away perfectly good fabrics! Maybe I'll make something like this or this with the leftovers?

But there I go again getting ahead of myself. Borders on this one first, Shelley, borders on this one first!

Friday, February 17, 2012

pink and red Dotty Stars

I cranked out two more Dotty Stars this week! Pink and red for Valentine's Day :)


I wish I could tell you that the time to make each block has significantly decreased, but that just isn't so. Maybe I'm down to 2.5 hours each, but the cutting just takes forever!

Note the cupcake and french words fabric in the center squares of this pink block :)


Can you find the fried eggs and Mary Engelbreit cherries in this red one?


It's been so fun to revisit old favorite fabrics while making these blocks. Even the littlest triangle reminds me of something else I've enjoyed sewing.

Progress so far - 4 down, 5 to go!


The pattern is available for free download from the Better Homes and Gardens All People Quilt site here. C'mon, you know you wanna make some, too!

Tuesday, February 14, 2012

orange Dotty Star

I love to have several projects going at once so when I'm bored with one, I can move on to another for a couple of days. But right now there are so many things in progress that the piles are starting to bother even me!

One thing I did manage to finish last week is this orange Dotty Star. Even though it seems to take forever to cut all the pieces for one block, I just love how they are turning out!


I added a lot of yellow and a little bit of pink to liven it up, and I think I'll use that same strategy for the rest of the blocks. A little yellow always makes things more cheerful!


Don't they look great as a pair? Two down, seven to go. Little half-square triangles are piling up everywhere!

Monday, January 30, 2012

please follow the directions

Did you ever take one of those tests in elementary school that is designed to measure your ability to follow directions? You know, the one that has about 30 numbered directions starting with:

"1. Read items 2-30 before you write anything."

The next 28 items are commands like "draw a circle in the upper left corner of this page" and "draw a smiley face at the end of this sentence".

And then the last line says:

"30. Write your first and last name in the upper right corner and make no other marks on this paper. Put your pencil down on your desk when you have finished."

Yeah, so my paper was filled with smudged eraser marks indicating that I had, in fact, NOT read all the directions, but just dove right in doing what items 2-29 directed, but not what the very first direction indicated.

I remember that test vividly, and most acutely on days like last week when (once again) I didn't read all the directions carefully.


This is my corrected version of the first Dotty Stars block. It has quite a few more dark pieces than the original. The first time I just dove in and madly started cutting 3" half-square triangles in lights and darks without reading that I needed 3 times as many darks as lights. Nor did I read that once I composed a sub-unit of 4 triangles (1 dark and 3 light) I only needed to repeat that 3 times, not 15 - the other 12 sub-units should be made of 1 light and 3 darks. So the resulting finished block didn't have enough darks and none of the seams were pressed correctly. It looked okay from the front, but I knew it could be better, so I took it apart and did it as directed.


Lesson learned. Again. Maybe it will stick this time :)

Wednesday, January 25, 2012

Dotty Stars

Have you noticed all the varied and beautiful projects all over blog-land and flickr lately using scraps? Me too. And I've been growing my own overflowing pile of scraps here with no earthly idea what to do with them until last week.

When I remembered this magazine...


Yep, had this pattern for quite awhile now just waiting to amass the scrap quantity needed to start in on it. Well folks, the scrap quantity required has been surpassed, so I dove in one day last week!


Three hours later - no joke, three hours - I finished this spectacular star block!


I gotta be truthful here, the first two hours and forty-five minutes of those three hours I was thinking to myself:

"Hey, maybe this whole scrap usage thing just isn't for me."
"I've got plenty of other projects using NEW fabrics that I could be working on right now."
"This is absolutely the first and LAST one of these blocks I'm making."
"This is so not worth my time!"

But then I finished it, and I noticed that most of the points actually matched and the whole thing was 18.5" square just as it should be. And I loved it. LOVED IT!

I love it so much that I even took it apart today to re-make it correctly. More on that next time (I have issues with actually reading directions - I much prefer illustrations.)

So yes, I'll be making more with the intention of actually finishing the project.  This year.

Hopefully.

Well, probably...

LinkWithin

Related Posts Plugin for WordPress, Blogger...