Pages

Showing posts with label polka dots. Show all posts

Friday, February 5, 2016

mystery medallion 2016

The Crystal Lake Modern Quilt Guild is sponsoring a new challenge this year - a Mystery Medallion program where we each create a quilt center block of any size to start and add a border each month for the next five months. The fun (or challenging) part is that no one knows what the requirements for each of the five borders will be; they are revealed month by month. So no planning or scheming ahead of time - just jump in and make it work each month!

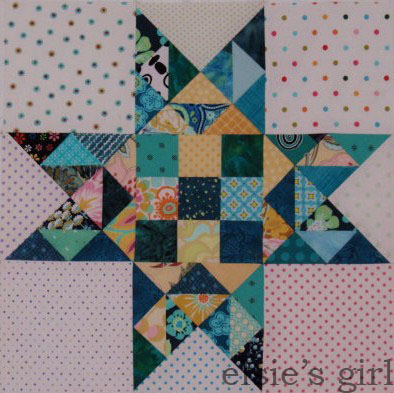
My quilt center is an English Paper Pieced (EPP) star on a background of "made fabric" (a bunch of low volume scraps sewn together), and it measures 22.5" square.  The star is machine appliqued to the background with a short straight stitch around the outside edge.


The background fabrics were left over from blocks I made for a quilt shop sample in 2014; it hung there as a sample for quilt kits they were selling, and after that I'm not sure where it ended up. The "plus" blocks were made from a pattern found here.  I really did love it, so one day soon I'll have to make another and keep it for myself (adds yet another project to the much too long already project list.)


The hexagons in my quilt center were made even before 2014 when I was first learning how to EPP one spring break vacation in Florida. I was never sure what to do with them, and at one point they were sewn together in rows. Maybe I was planning to put them on some pillows? Who knows!


But sometime last year I saw a photo of a star made from hexagons so I took the rows apart, and sewed them into the large star shape composed of 73 hexagons. So the star and the background piece have been hanging around on the design wall for quite some time just waiting to be used in a project.

The whole point of a Mystery Medallion Challenge is to let go of control and practice your design and color skills each month when the new border requirements are revealed. At our meeting last weekend we learned that January's border must include snowball blocks and use the color red violet.

RED VIOLET?! Sweet - one of my favorite colors, and I happen to have lots of it in my stash.  I gathered a few fat quarters that were primarily red violet, tossed in a couple more that were primarily yellow (but still contained pink/violet), added a stack of more low volume scraps, and started cutting.


Since my center square measured 22.5" I needed to add a "spacer" border to increase the size to 24.5" in order to accommodate the 4" snowball blocks I planned.  This Peppered Cotton in Fog by Studio E has just enough contrast to set it apart from the backgrounds, but it doesn't overwhelm and grab all the attention.  It was cut at 1.5" width to finish at 1".


The 28 snowball blocks are each 4" finished, so now the quilt center measures 32.5".  I cut each center of the snowballs at 4.5" square and each corner background fabric at 1.75" square.  You can find a handy tutorial for making snowball blocks here.  Mine look more like stop signs (I probably should have made the corner pieces smaller) but whatever - I love how it's turned out!


Even if you aren't a member of CLMQG, you can follow along and make your own Mystery Medallion quilt.  Each month the new border requirements will be posted on our website, and photos of members' progress can be found on our Facebook page.

Friday, January 29, 2016

Sunny's quilt

And now a flashback to November 2015 to show you a secret project...

You may remember that in 2014 I made a quilt for each of my five sisters-in-law on my husband's side of the family.  In 2015 I was on easy street because I only have one sister-in-law on my side!

Sunny (Allysun) is my youngest brother's wife, and her personality is just like her name - happy, smiling, cheerful, sunny.  Their living room is decorated in greys, black, and pops of gold and yellow, so of course her quilt had to be primarily yellow :)


Her Twisted Blossoms quilt was made using the Quick Curve ruler and Metro Twist pattern (both from Sew Kind of Wonderful) and their quilt along found here.  That ruler requires a firm "measure twice, measure again, then cut" mentality; I wasted a good chunk of fabric when I first started cutting.  But once I realized my error and re-read the directions it was all smooth sailing from then on.  The curves are so slight that sewing the convex and concave units together was quite easy - no pins! - and the blocks are trimmed to size after sewing so it's nearly foolproof.  IF you carefully measure before cutting ;-)


I made 12 blocks using different yellow and grey prints combined with Kona Cotton in Snow.  Petals of each blossom block are formed by four sections cut and trimmed with the Quick Curve ruler and four modified half square triangle blocks.  The center squares are all unique grey prints combined with the Kona Snow to form a square-within-a-square.


Then it's a basic nine-patch construction for each block finishing at 16" square.


I switched up the final assembly of the quilt adding 2" finished sashing and grey cornerstones between each block and around the outer edge - it just needed a little something more than the blocks right next to each other could provide.  So with the added sashing the quilt finished at 56" x 74" - a generous lap size.


The quilting was done by Carol Linder in Hampshire, IL using the pattern "Random Clams" by Jessica Schick in a silver grey thread.  The binding is a white dot on charcoal grey from Jen Kingwell's recent Moda line "Gardenvale".


Sunny seemed thrilled with her new quilt when I presented it to her at Thanksgiving, and she later sent me a photo if it in their living room.  Great color matching if I do say so myself!

I have so many works-in-progress right now that it's a bit embarrassing.  But I still managed to start two new projects last week!  One of them is being quilted right now, and I hope to bring you photos of it completely finished next week.  Maybe one day soon I'll count all the UFOs again and publicly confess the number...

Thursday, November 12, 2015

my signature color

Whoa - I finished a quilt almost three months ago and forgot to tell you about it!  This is my Triple Star quilt with lots of fuchsia/magenta/pink so I'm calling it "My Signature Color".


During 2014 I was a member of an online bee group - Modern Instabee Hive 15 - that used quilt patterns from the book Modern Bee: 13 Quilts to Make with Friends by Lindsay Conner.  November was my month for the 11 other members to make blocks for me, and I asked them to use a variety of low volume fabrics for the background and loads of darker pinks for the 16" Triple Star block.  Using these fabrics from my stash (minus the turquoise prints) I made a couple of example/inspiration blocks.


During the months November 2015 - February 2015 Triple Star blocks from all over the continental US and Canada arrived!


The book pattern called for finishing the quilt with plain 2" sashing between the blocks and a couple of borders around the 3x4 block grid, but I changed it to include 4" sashing with additional stars as the cornerstones and no borders. Because I'm contrary like that. And because you can never have too many stars.  A sprinkling of turquoise cornerstone stars breaks up all of the pink.


The quilting was done by Carol Linder in Hampshire, and I chose the "Cracker Jacks" pattern with fuchsia thread - naturally!  The leftover black and white floral backing from this quilt made a fun (and free!) binding.


For the backing I used Wide Back Text in white from Windham Fabrics.


ALL the color names on the back of this quilt!


Many, many thanks to the members of Modern Instabee Hive 15! This is one of my all time favorite quilts, and what a great experience it was to work with all of you!

** I've been busy with some secret Santa sewing the past few weeks that I won't be able to share until January. But Carol currently has my Red Hot Dreamy Hexagons quilt top in her queue, and I've been diligently working on my Flower Garden Quilt. So there are still projects for me to share with you in the few remaining weeks of 2015 :) **

Monday, March 16, 2015

dots and low volume: stars for a block lottery

The Crystal Lake Modern Quilt Guild is introducing a new program at our April meeting - a block lottery! Any member that would like to participate makes a block (or two or three) following the rules for that lottery and each block earns that member one chance to win.  The winner of the drawing takes home all the blocks brought in for that lottery!

For our first lottery we chose a theme of star blocks made from dot fabrics on backgrounds of low volume fabrics. Any star block is fair game as long as the fabric requirement and size rules are followed.  The other board members and I each made a couple of blocks as examples to show the guild at our March meeting. For my first sample block I modified a pattern in the book Modern Bee - the Triple Star. My 12.5" unfinished version is a Double Star...


The center square finishes at 3" surrounded by half-square triangle (HST) and square units that finish at 1.5". The outer star HST and square sections all finish at 3". I chose to use a variety of blue dot fabrics as well as a wide variety of low volume background fabrics.

My second block was cut using the Easy Dresden ruler (you can watch a Missouri Star Quilt Company video tutorial explaining how to use the ruler here). The orange blades were cut from a 3.5" x 22" fabric strip, and the pink blades were cut from a 4.5" x 22" strip. One strip of each color is plenty for the entire block. After sewing each blade point and then sewing the blades together, I machine appliqued the entire unit to the 13" square background fabric. The background fabric was cut slightly larger because when appliqueing a block like this the background fabric tends to shrink up a bit.


The center circle of the dresden star was backed with Heat and Bond Lite so it could be fused to the dresden and background. I used a machine blanket stitch to permanently secure the circle to the center and then trimmed the block to the required 12.5".

This post contains photos of the other samples made as well as more details of the block lottery program.  I'm very excited to see the blocks that other members bring in April - maybe I'll be the lucky winner!  I sure wouldn't mind winning mine and the other sample blocks for myself :)

Wednesday, February 5, 2014

Tree of Life 2013 finish

Somehow I skipped posting these photos of my completed Tree of Life quilt last year. It's obvious from all the photos that it was actually completed in late summer/early fall - when the grass was still green and the breezes still warm. These photos are a great cheer to me today in these early days of February when it is snowing (again!) and I'm seriously contemplating running away from home until May!


Friday, November 1, 2013

Thank You Lynn!

I have a wonderfully spunky friend Lynn (who always has the most infectious smile on her face) with mad skills in graphic design. Earlier this year (much earlier) she designed a logo for our newly forming Crystal Lake Modern Quilt Guild. In order to thank her properly with no funds to our name, we designed and made a quilt specifically for her.


And now that quilt has been delivered to her! After I finished sewing the quilt top, Paige (our CLMQG President and amazing machine quilter) finished this on her long-arm machine with an all-over pattern of swirls and curls in a light yellow thread.


The backing is one of my favorite prints from Heather Bailey's Pop Garden line - Pop Daisy in Red.


Lorrie (another CLMQG member and friend from SewMod Designs) sewed the red and white polka dot binding.


And this is my lovely friend Lynn. If you are ever in need of some awesome graphic design work, drop me a line and I'll pass your info to her. She really is the best!


Thanks Lynn!!

You can read more about the construction of this quilt here. The finished size is approximately 63" x 68".

Monday, August 12, 2013

pillow finish for Alexis

If you follow me on Facebook or Instagram (yes, I caved and put myself on Instagram - and it's been FUN - but more about that another time), you know that last Monday I started an impulse project. While shopping at JoAnn Fabrics recently, I spied some fun orange and navy prints in the Denyse Schmidt collection. That started the wheels turning thinking about our niece, Alexis, who LOVES the University of Illinois sports teams, and the Illini colors are... wait for it... navy and orange!! Since she is leaving for college in a couple of weeks, I decided she needed an orange and navy pillow to coordinate with her navy comforter in her new home away from home.


Now she isn't going to be attending the U of I, but that will not change her love for their teams :) Here's a look at the fabrics I bought, all strip cut and ready to piece...


Using this pattern from the book, Scrap Basket Beauties by Kim Brackett.


Here's what the blocks look like after piecing...


And this is the layout before sewing. Since the blocks are set on point to resemble "X"s, there is some waste from trimming the sides. The end result isn't quite what I had envisioned - it feels to me like the intended design is a little bit lost, and I'm not sure if that is from the dots on navy causing distraction or because the orange fabrics are blending too much. But Thing 1 here at my house assured me that it was "cute" and that Alexis would "love it".


So I added a border of the dots on navy, layered the completed top with some lightweight flannel and a muslin backing, and quilted around the "X"s with an orange thread.


An envelope backing of the navy dots (which is the fabric that first caught my eye and launched the idea!) trimmed with a thin strip of orange print finishes it all off.


I'm happy to report that the pillow is now in the care of it's new owner, and it will be moving to college with her in a couple of weeks :)

Pillow stats: 18" finished. All the fabrics used were designed by Denyse Schmidt and were purchased from JoAnn Fabrics. I used 1/4 yard of each of the four orange prints and 1 yard of the dots on navy.

Friday, February 15, 2013

Polka Dot Sunburst Baby

I rarely make the same quilt twice. But I cranked this one out in about three weeks because I was lucky enough to get the opportunity to teach the technique in a spring class at an LQS, Material Girl Fabric Shop in Crystal Lake! This version full of bright, happy polka dots will be hanging in the shop...


It is the same size as my previous Sunburst quilt - 42" x 55" - and constructed in the same manner as the tutorial that I wrote earlier in 2012. Click on the "Tutorials" tab above to access those instructions.


I quilted this one with an all-over meandering stitch in light pink thread. And I added a bright pink stripe cut on the bias for the binding - I love, love, love a bias stripe binding!


My color inspiration came from this lovely backing fabric in the Benartex Sun-Kissed collection by Michelle D'Amore. This print is called "Spray" in her Tropical colorway.


The number 1, Group A item on my UFO list now complete! That means I'm down to 28!


It is still sooo cold here in Northern Illinois, but the sun is shining and the birds are singing on this fine Friday morning :) Happy Weekend everyone!

Wednesday, January 23, 2013

SOLD to the highest bidder!

Last week I whipped up a couple of cute quilted pillows for an auction next month benefiting the music department at Thing 2's high school. She's playing her cello in the pit orchestra for the spring musical "Into the Woods", and over the two performance weekends several items are up for silent bid auctions.  I think these pillows would be perfect for a pre-teen or teen girl bedroom, so I hope they generate a lot of interest and bids!

I can't decide which way I like them better - diamonds vertically...


or horizontally...


I was able to use all scrap fabrics from previous projects (mainly this skirt) for the center diamonds composed of 60-degree triangles. The only fabric I had to purchase was the Michael Miller "Dumb Dots" for the borders and backings. Yeah for using scraps!

The simple straight line quilting on the pillow fronts echoes the diamond shapes in a pale orange thread.


I varied the placement of fabrics in each pillow and the border colors so each 20" pillow would be unique.


The zipper on each pillow back is concealed with a flap. First time I've done that, and I'll be doing it for every pillow from now on! Such a clean and neat look, and not much more difficult than a standard zipper insertion.


Part of me wants to hang on to these because I'm so pleased with how they turned out. But they don't coordinate with anything else in the house, so off they go! Hope they make a local young girl happy :)

Monday, June 18, 2012

Dotty Stars finished!

My Dotty Star is quilted and bound!


I chose an edge-to-edge quilting design (also known as pantograph) called "Petal Pushers" in a very pale pink color. My long-arm quilter has a giant array of patterns to chose from, and I wanted something flowery but not too dense because the front is busy enough already! The backing is primarily the flower dots on blue print you see here with a white on white strip right down the middle. I had to make-do with what was left on the bolt of those flower dots. Quilt backing fabric on clearance - gotta love that!


The binding is an irregular white dot on black print. Something about the uneven spacing of these dots seemed a better fit than dots in a grid pattern. And of course, it just had to be a print with dots!


It's now hanging in its new habitat - my sewing room! I took down my Mary Engelbreit New York Beauty quilt and placed it on my new quilting ladder. It feels pretty good to have enough quilts here at my house to be able to rotate them.

If you'd like to see any details about the pattern I used for this quilt and some construction tips and tricks, you can read all about it by clicking on "Dotty Stars" in the Labels section in the right sidebar.

Monday, February 27, 2012

Dotty Star borders

Over the weekend I chose a new layout for my nine Dotty Star blocks. The layout I posted last week felt like there was too much blue and not enough yellow. But this new one feels more sunny overall :)


The borders were cut and placed to correspond with the main color of each block. So now with the 3" border all around, my quilt top size is 60" x 60".


I purchased a black with white dots fabric last week for the binding, so now I've just got to find a backing and decide how to quilt it. I'm pretty set on sending it out to be quilted, but I'm not sure if I'll have her do an all-over pattern or something more custom. The quilt photographed with the pattern has the stars ditch-quilted with various circular motifs quilted in the background square spaces. Any suggestions for me?

Friday, February 24, 2012

9 out of 9 finished!

I am just floored by what can be accomplished when I stick to one project at a time! This week I managed to crank out the last five of my Dotty Stars, and here they all are together on the design wall...


I'm not sure if this will be the final layout; the borders need to be cut and placed around the perimeter before I decide for sure. I've got a close-up shot of each of the five new blocks for you next, but be sure to scroll all the way to the end of this post for some helpful tips should you decide to make your own Dotty Stars quilt!


Tips and Tricks for making your own Dotty Stars Quilt

Nine stars provides quite a bit of practice, so I made a few notes to help you with yours :)

1. I am a big believer in Mary Ellen's Best Press spray. There are tons of bias edges in these quilt blocks, so do yourself a favor and stabilize all that fabric with Best Press or another starch-like product before cutting anything.

2. Make it easy on yourself and just cut a mess of your scraps into 3" squares. You'll need a ridiculous amount of HSTs cut from 3" squares to make this quilt.


3. For each star you'll need 28 dark HSTs and 20 light HSTs cut from your 3" squares, and 9 total 2.5" squares - 5 dark and 4 light. Cut these center squares from your pile of 3" squares after you've made the triangle sections.


4. Add some yellow to each block to pull everything together in the end. I wish I had added some black and white to each one as well - I think it would have given more contrast within each star.

5. When sewing your small triangle units (the point sections of each star) use the full 1/4" seam allowance, but when sewing the center four patches use a scant 1/4" seam. The first couple of blocks my pieced triangle sections were always bigger than the 4 squares at the corners and the center 9 nine patch; the only way I could fix this (since all my corner squares were already cut) was to vary the seam allowance slightly between the triangle and square sections.

6. When sewing the main nine sections of each star block together, press those seams open. For all other seams within the block sections, press according to the pattern instructions.

I used all scrap fabrics for the colored portions of each star, but I did purchase 12 different 1/4 yard cuts of dots on white to use for the backgrounds. It doesn't seem like I used up that many of my scraps. My friend Lorrie thinks that scraps multiply once you start cutting them, and it sure seems that way here. I feel like I've still got enough HSTs cut to make another quilt. What should I do with them? It's so hard to throw away perfectly good fabrics! Maybe I'll make something like this or this with the leftovers?

But there I go again getting ahead of myself. Borders on this one first, Shelley, borders on this one first!

LinkWithin

Related Posts Plugin for WordPress, Blogger...