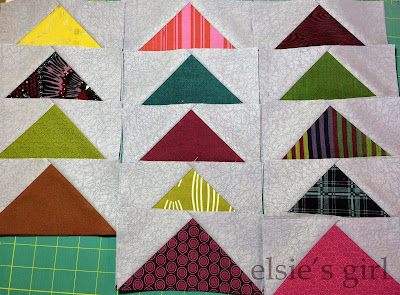
I had it in my head that 198 flying geese blocks (finishing at 3" x 6") were needed for the borders, but I really only needed 98. As I sat on the floor Saturday positioning the blocks I kept wondering "why does it seem like there are way too many of these?" Ummm... because there were too many! When designing the pattern I had intended to use my Sizzix dies to cut all of the pieces which included 196 background fabric triangles - aha! That's how the extra 100 got stuck in my mind! But then I decided to use the Eleanor Burns flying geese method (shown below) because there is no triangle cutting involved and very little fabric waste. So the lesson here is always check back with the pattern before cutting - and that no matter how long you've been sewing there is always something to learn!
Now for the fabulous 4-at-a-time-super-easy-and-accurate flying geese method that I used - you'll need a "Quilt in a Day" Flying Geese ruler. There are two sizes available; mine makes blocks 1.5" x 3" or 3" x 6". I'm using a Frixion pen to mark my fabrics because the ink vanishes when you iron it, but you should definitely test this on your fabrics first!
To make 4 flying geese units that finish at 3" x 6" cut one 9" background fabric square and one 7.5" main fabric square. Place the background (grey) fabric square right side up and mark the center diagonal line. Place the main (pink) fabric square right side down over the background piece and mark the center diagonal line. Center the main fabric just by eyeballing it, but make sure the diagonal line matches up with the background. Pin in a couple of spots to secure.
Now sew a 1/4" seam on both sides of the drawn line.
Cut on the diagonal line.
Press each unit with the seam allowance toward the background fabric.
Place the two units right sides together with the main fabric pieces opposite of each other. DON'T NEST THE SEAMS - align the outer edges of the two pieces.
Mark the center diagonal line on the top unit as shown and pin to secure.
Sew a 1/4" seam on both sides of the drawn line.
Cut on the drawn diagonal line.
Make a small snip in the center of each seam allowance to aid in pressing the seam allowances correctly.
Press the seam allowances toward the background fabric again. Here is a shot of what your two pieces should look like from the back and front.
Align the marked triangle on your Quilt in a Day ruler with your block as shown. (Those little tan dots are sandpaper disks I stuck to the back of the ruler to help keep it from slipping around on the fabric.) Trim the excess fabric along the right and top edges of the ruler, then pivot the fabric and ruler so you can cut the left and bottom sides. If you have a rotating cutting mat on hand definitely use it for this step.
And from two squares of fabric you now have four perfectly sized identical flying geese blocks!
I repeated this process 49 more times to get my 200 blocks (even though I could have stopped at 24 repetitions - hehe!)
200 flying geese ready to go!
This is the background fabric that Thing 2 has chosen; it's from the Waterfront Park line by Violet Craft for Moda. Line drawings of bridges in white on navy - perfect for a Civil Engineering major :)
Monday morning this is off to the quilter! I probably won't see it again until mid-July, but I'll be sure to share photos of the finished product before it heads to it's new (dorm) home in mid-August. Oh, and she loves it. She really loves it :)
Final stats:
- Quilt will finish at 66" x 93"
- Applique center finished at 42.25" x 81"
- Side borders to applique section (added before flying geese) finish at 6" x 81" and 5.75" x 81". These borders were not pieced - they were cut on the lengthwise grain to avoid seams.
- 6.5 yards of background fabric is probably what is needed to make this quilt without sewing an extra 100 flying geese. 7.5 yards is what I actually purchased and cut.
- Flying geese units were made from applique scraps and quarter yard cuts. Fabrics used include several Studio E Peppered Shot Cottons, a few P&B Textiles blender prints, as well as AMH, Parson Gray, Juliana Horner, and Denyse Schmidt prints.


