A branch of the Modern Quilt Guild is starting in my area! A couple of friends and I started kicking the idea around last fall, and we've finally made it happen...
If you are able to join us, we'd love to see you at our first meeting, February 10 from 1-4 p.m. at the Home State Bank Commercial Banking Center at 611 S. Main Street, Crystal Lake, IL 60014.
Please check our website for all the important details. "Like" us on Facebook to receive the latest updates directly in your news feed.
All quilters and sewists with a love for modern fabrics and/or quilting designs are welcome. New to quilting or sewing? No worries - we are interested in bringing together people of all skill levels. Check it out - we're going to have great FUN!
Thursday, January 10, 2013
Tuesday, January 8, 2013
Happy 2013!
I'm a little late to the party wishing you all a Happy New Year, but better late than never, right?!
I managed to squeak out a few finishes at the very end of 2012 - and I do mean the very end. As in December 31!
This Sunburst Baby quilt had been quilted with an all-over stipple pattern...
And the binding was machine-attached in mid-December...
But the label wasn't attached until New Year's Eve. It's now been delivered to the family, and hopefully they are enjoying it :)
This sweet pink and yellow jelly-roll baby quilt is headed to a local hospital NICU unit with lots of other baby quilts made by my sewing group at church.
Love that sweet polka dot binding...
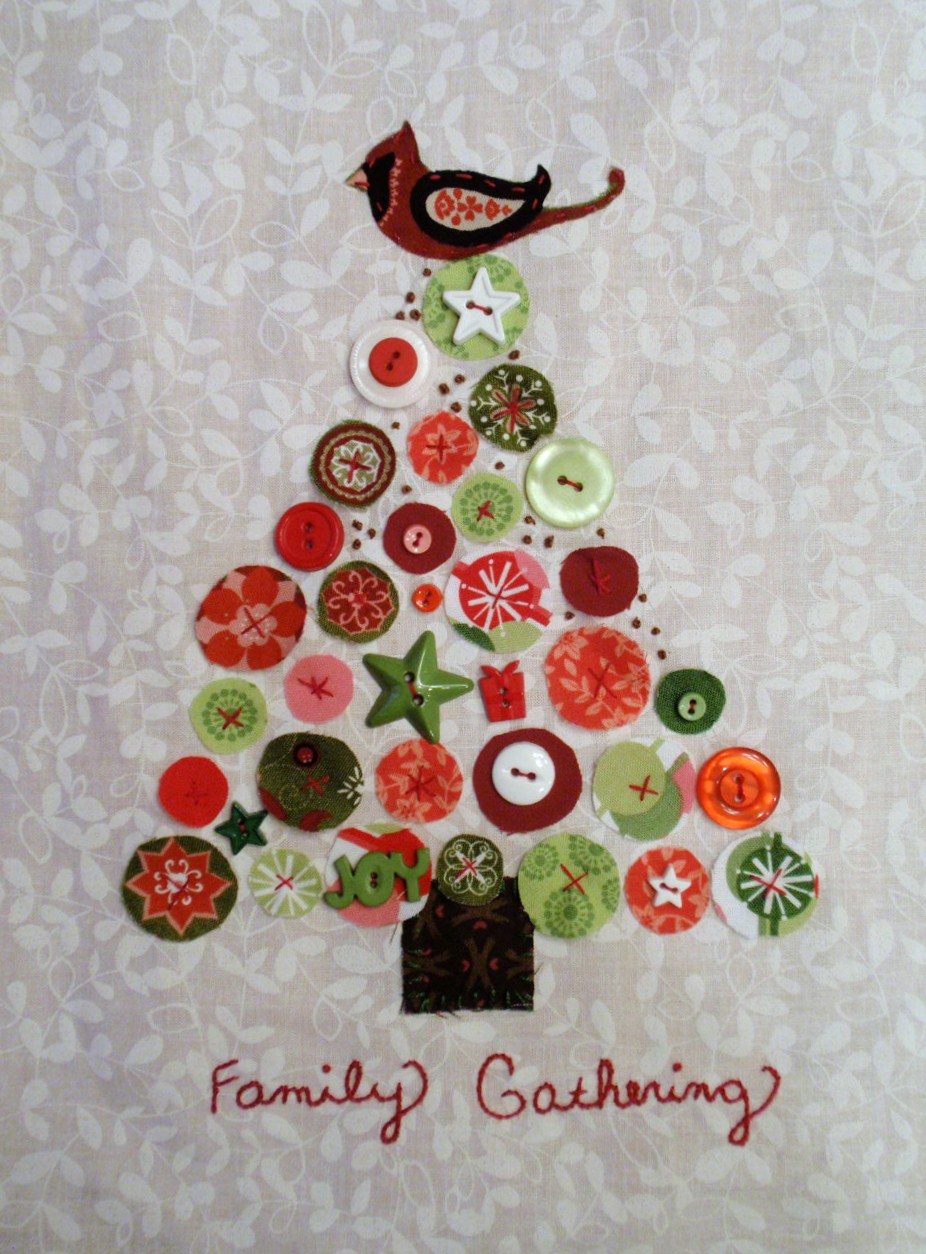
And last but not least, true to my usual habit of finishing a holiday project within days of the holiday, my little button tree was framed just long enough to sit on the hearth for a photo. It's now packed away, and I'll likely forget about it until late November this year when we haul all the decorations up again. I'll open the box, unwrap it, and say something like, "oh how lovely! I'm so glad I finished it!"
I'd like to say that I resolve to finish more of what I start this year, but that's just not me. I do resolve to finish items with a deadline first, but then I'm just going to work on whatever makes me happy at the moment, and if it gets finished, great! But the whole point should be to have fun, shouldn't it?
Here's to a healthy, happy, and FUN 2013!!
I managed to squeak out a few finishes at the very end of 2012 - and I do mean the very end. As in December 31!
This Sunburst Baby quilt had been quilted with an all-over stipple pattern...
And the binding was machine-attached in mid-December...
But the label wasn't attached until New Year's Eve. It's now been delivered to the family, and hopefully they are enjoying it :)
This sweet pink and yellow jelly-roll baby quilt is headed to a local hospital NICU unit with lots of other baby quilts made by my sewing group at church.
Love that sweet polka dot binding...
And last but not least, true to my usual habit of finishing a holiday project within days of the holiday, my little button tree was framed just long enough to sit on the hearth for a photo. It's now packed away, and I'll likely forget about it until late November this year when we haul all the decorations up again. I'll open the box, unwrap it, and say something like, "oh how lovely! I'm so glad I finished it!"
I'd like to say that I resolve to finish more of what I start this year, but that's just not me. I do resolve to finish items with a deadline first, but then I'm just going to work on whatever makes me happy at the moment, and if it gets finished, great! But the whole point should be to have fun, shouldn't it?
Here's to a healthy, happy, and FUN 2013!!
Labels:
baby quilt,
Christmas,
holiday,
jelly roll,
machine binding
Thursday, December 13, 2012
happy holiday button trees
I had some girlfriends over this past weekend for a little crafting party, and take a look at this cute project we worked on - Christmas Button Trees! They were so easy and fun to make. All you need are some holiday fabric scraps, buttons, and embroidery floss to make your very own.
Here's mine all stitched and ready to be framed...
This was our prototype that Lorrie completed last year and gave to a good friend. The pattern comes from a 2011 Better Homes and Gardens magazine called "Holiday Crafts", and the finished tree fits in a frame with an 8" x 10" opening. Lorrie purchased a white frame from a local craft store and painted and distressed it to showcase her beautiful work.
We each put our own personality into our individual projects, and they all turned out beautiful! Here is Wendy's glammed-up tree on a dramatic black print background...
Kelly's traditional red and green tree - she put a bird on it! And she chose a different embroidered message to personalize it even more...
Andrea's whimsical snowman-topped tree...
And Paige's red batik tree complete with bling and garland!
Lorrie also made a new tree to keep for herself this year - can you believe all those buttons?! I love her "Swell Noel" embroidery!
Here we are hard at work at my kitchen table...
Dixie is under the table hoping for dropped food, but she only got stray buttons and fabric scraps!
The mess necessary for creativity...
Of course we had to partake in some festive holiday beverages! These pretty drinks are Poinsettias - roughly equal parts Prosecco and cranberry juice - a little bit of pink bubbly cheer...
An hors d'oeuvres potluck to keep us sustained during our hours of crafting...
And the best for last - a delicious red velvet cake from Lorrie...
Such fun to spend a December weekend day with these great girls! I hope you are all able to spend some time with friends during this busy time of year :)
Here's mine all stitched and ready to be framed...
This was our prototype that Lorrie completed last year and gave to a good friend. The pattern comes from a 2011 Better Homes and Gardens magazine called "Holiday Crafts", and the finished tree fits in a frame with an 8" x 10" opening. Lorrie purchased a white frame from a local craft store and painted and distressed it to showcase her beautiful work.
We each put our own personality into our individual projects, and they all turned out beautiful! Here is Wendy's glammed-up tree on a dramatic black print background...
Kelly's traditional red and green tree - she put a bird on it! And she chose a different embroidered message to personalize it even more...
Andrea's whimsical snowman-topped tree...
And Paige's red batik tree complete with bling and garland!
Lorrie also made a new tree to keep for herself this year - can you believe all those buttons?! I love her "Swell Noel" embroidery!
Here we are hard at work at my kitchen table...
Dixie is under the table hoping for dropped food, but she only got stray buttons and fabric scraps!
The mess necessary for creativity...
Of course we had to partake in some festive holiday beverages! These pretty drinks are Poinsettias - roughly equal parts Prosecco and cranberry juice - a little bit of pink bubbly cheer...
An hors d'oeuvres potluck to keep us sustained during our hours of crafting...
And the best for last - a delicious red velvet cake from Lorrie...
Such fun to spend a December weekend day with these great girls! I hope you are all able to spend some time with friends during this busy time of year :)
Tuesday, December 11, 2012
a few more trees
Progress! Trees 6-11 are completed...
Thank heavens for a long iPod playlist of Christmas favorites to sing along with while wearing a carpet path from the sewing machine to the ironing table and back!
Only four more to go...
Thank heavens for a long iPod playlist of Christmas favorites to sing along with while wearing a carpet path from the sewing machine to the ironing table and back!
Only four more to go...
Thursday, December 6, 2012
spools progress
Yes - Lorrie and I are making spools! Our last sewing session earlier in November yielded quite a bit of progress...
We sewed our remaining eight strip sets giving us a total of 36 sets. We each need 41 pieces measuring 3.5" x 4.5" for our spools. Due to some over-zealous strip cutting on my part, we actually had enough strip sets made to make 4 spool quilts! Our extras have been stashed away for another project - we're not sure what project - but they will be used for something!
We then sewed the side pieces onto each colorful spool, pressed them, and called it a day. Here are some samples of what we accomplished. Pink spools...
And teal spools...
And now it's December and we got back to business today! It was a very tedious day of sewing - making 82 spool tops and bottoms for each of us. Yep, that's right. We spent the entire sewing time today adding these little triangles to the ends of the brown strips.
Over three hours for each of us sewing and pressing. The most boring part of the project so far. Mind numbing as it was, thank goodness we were working on it together or else it might have gone straight to the WIP pile (or out the window!) But we plodded through, and next week we'll be on to a more fun task - actually finishing the spool blocks!
Project hours from our November session:
Sewing strip sets - 2 hours
Cutting spools - 2 hours
Sewing blocks - 3 hours
Project hours from today:
Sewing spool tops and bottoms - 7 hours
Grand total from 3 sessions: 25 hours to date
To see more about the beginning of this project read this post.
We sewed our remaining eight strip sets giving us a total of 36 sets. We each need 41 pieces measuring 3.5" x 4.5" for our spools. Due to some over-zealous strip cutting on my part, we actually had enough strip sets made to make 4 spool quilts! Our extras have been stashed away for another project - we're not sure what project - but they will be used for something!
We then sewed the side pieces onto each colorful spool, pressed them, and called it a day. Here are some samples of what we accomplished. Pink spools...
And teal spools...
And now it's December and we got back to business today! It was a very tedious day of sewing - making 82 spool tops and bottoms for each of us. Yep, that's right. We spent the entire sewing time today adding these little triangles to the ends of the brown strips.
Over three hours for each of us sewing and pressing. The most boring part of the project so far. Mind numbing as it was, thank goodness we were working on it together or else it might have gone straight to the WIP pile (or out the window!) But we plodded through, and next week we'll be on to a more fun task - actually finishing the spool blocks!
Project hours from our November session:
Sewing strip sets - 2 hours
Cutting spools - 2 hours
Sewing blocks - 3 hours
Project hours from today:
Sewing spool tops and bottoms - 7 hours
Grand total from 3 sessions: 25 hours to date
To see more about the beginning of this project read this post.
Monday, December 3, 2012
the assembly line approach
I'm deeply entrenched in the part of any quilting project where I am most likely to lose focus and let my eyes and mind wander to other pretty fabrics and all the possibilities they hold... the assembly line.
You know, that part when you've made enough of the blocks to have worked out all the kinks and you know how they're going to look all put together? The part where you've just got to put your head down and crank out the rest of the blocks so you can move to the next step? That's where I often lose the battle to finish what I've started - not always, but often. Tell me I'm not the only one who struggles with this.
With five of my trees blocks completed, I went on a fabric cutting spree to get all of the remaining batches of leaves cut at once so when time allows I can keep my head down and sew, sew, sew. Here they are - 10 bunches of leaves-in-waiting...
And some spare parts just in case I have a change of heart about a certain color during the assembly process.
There are two more sets of leaf fabrics here than I'm going to need, but I decided making some extra blocks would be worth the extra work in the end. Those that don't make it to the quilt front will be pieced into the quilt back.
I've still got my joint project with Lorrie in the works, and I'm feeling the need for some Christmas cheer pillows for my family room, but I'm determined not to abandon these trees completely! They won't be finished this year, but they won't go back in the WIP pile either!
You know, that part when you've made enough of the blocks to have worked out all the kinks and you know how they're going to look all put together? The part where you've just got to put your head down and crank out the rest of the blocks so you can move to the next step? That's where I often lose the battle to finish what I've started - not always, but often. Tell me I'm not the only one who struggles with this.
With five of my trees blocks completed, I went on a fabric cutting spree to get all of the remaining batches of leaves cut at once so when time allows I can keep my head down and sew, sew, sew. Here they are - 10 bunches of leaves-in-waiting...
And some spare parts just in case I have a change of heart about a certain color during the assembly process.
There are two more sets of leaf fabrics here than I'm going to need, but I decided making some extra blocks would be worth the extra work in the end. Those that don't make it to the quilt front will be pieced into the quilt back.
I've still got my joint project with Lorrie in the works, and I'm feeling the need for some Christmas cheer pillows for my family room, but I'm determined not to abandon these trees completely! They won't be finished this year, but they won't go back in the WIP pile either!
Thursday, November 1, 2012
combined effort
Today Lorrie (from SewMod) and I started a new project together! We're only going to work on it during our sewing days together, and in the end we'll each have our own quilt - each one different but both very similar.
Over the past week I've cut 200 or so of these...
And today the two of us turned 75% of those strips into these sets...
Pretty, huh?
And the next step will be to cut all the finished sets into these...
Any guesses about what they might become?
And just for fun I'm keeping track of hours the whole project takes us. So far:
Cutting strips: 4 hours
Sewing strip sets: 7 hours today with about 2-3 hours remaining
Over the past week I've cut 200 or so of these...
And today the two of us turned 75% of those strips into these sets...
Pretty, huh?
And the next step will be to cut all the finished sets into these...
Any guesses about what they might become?
And just for fun I'm keeping track of hours the whole project takes us. So far:
Cutting strips: 4 hours
Sewing strip sets: 7 hours today with about 2-3 hours remaining
Subscribe to:
Posts (Atom)