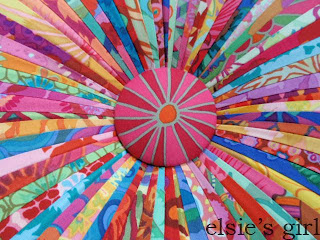
Sunday's project day was a success!! Here's my tuffet in all it's Kaffe glory. What do you think?
The center fabric-covered button...
The lovely stained and polyurethaned feet (thank you dear husband!)...
In it's new home with the Kaffe Crayon Box quilt...
Now I'm not gonna lie to you, this project was very labor intensive. Lots of foundation piecing of the (64) 2 1/2" jelly roll strips to muslin patterns (eight sections just like this one)...
There is a LOT of prep work (thanks Lorrie!) involving cutting the plywood base, hammering in the T-nuts to hold the feet, and cutting the two layers of 3" thick foam. After stapling a layer of Warm and Natural batting over the plywood and foam base, we then centered and
s - t - r - e - t - c - h - e - d
the foundation-pieced cover over the batting...Lorrie, Me, and Andrea working as a team!
stapled that layer down, and threaded the upholstery needle through the bottom...Lorrie and Andrea putting the button on Andrea's tuffet.
then pushed the button in while simultaneously pulling the string out the bottom while simultaneously pushing against the base. Whew!! Do not try this at home by yourself!!
Lorrie, Andrea, and Vicki really putting their muscles into it!
Lorrie over at SewMod organized this entire project and guided us through every step. Thanks for all the motivation, legwork, and assistance, Lorrie - I never would have attempted (let alone finished) this on my own!In fact, while I was elbow-deep in foundation-piecing, I declared that I would never make another one of these tuffets. But now that I've had a few days to admire it's loveliness, the memory of the pain is slowly ebbing from my mind... kind of like after birthing a baby - you swear you'll never do it again, but then the baby paralyzes you with it's cuteness and you forget all that pain...
I guess I've been paralyzed by it's cuteness :)
Oops, I almost forgot to show all the finished work! Clockwise from the bottom left: Andrea's Fandango tuffet, Lorrie's Soul Blossoms tuffet, and Vicki's Amy Butler assorted tuffet.


OH MY HEAVEN'S!!!! That is simply amazing! I love it!
ReplyDeleteAbsolutely fabulous!!!! I'll bet you'll enjoy your wonderful tuffet for many years to come...and it will make you feel good that you worked so hard to make it? It's kind of like slaying a dragon! LOL
ReplyDeleteHoly smokes! This is an amazing tuffet. It makes me grin just looking at the pictures, can't imagine how happymaking it must be to have it there in your house!
ReplyDeleteI love it! I took this class from Myra...she worked (maybe still does?) at my local quilt shop. It was a blast. I can't say I remember every step though, hence why I haven't made another. The fabrics are great and I *really* love your feet!
ReplyDeleteWow Shelley that is just amazing - and so beautiful and so you!!!
ReplyDeleteI have long been tempted by this project but have not taken the plunge! Your tuffet is fantastic!
ReplyDeleteWow, this is amazing!
ReplyDeleteI love it!!! When you forget all the pain, can you birth me one? hehehehe It's beautiful!!
ReplyDeleteLove it! But where's the gratuitous photo of the cute dog on it, like Andrea's tuffet photo?
ReplyDeleteOh, my gosh! They are all fantastic! I would love to make one of these.
ReplyDeleteOH MY GOODNESS! i love this! Never seen one before! how do I make one??
ReplyDeleteThat's so gorgeous!
ReplyDeleteLittle Miss Muffet would crazy about this tigger...just like I am!!!! Wow! It's absolutely gorgeous!!!! Fantastic job!!!
ReplyDeleteGorgeous!
ReplyDeleteThanks Mama Deborah!
DeleteI would love to try this project, where would you purchase these frames to create this gorgeous piece? I hope you can direct me. I stumbled upon your blog on Pinterest and its loaded with stunning projects. Great Work.
ReplyDeleteWendy.
wow i want to make one im a bit confused did you cut two circles of plywood and put firm foam in between them then cover it with a softer foam followed with wadding and them cover with the fabric?
ReplyDeleteHi Avril! Here's a link to another post about our tuffet making party written by Vicki. She has a great photo in the post of what the tuffet base looked like before we covered it with the colorful pieced top: http://acciofabric.blogspot.com/2011/02/eating-my-curds-and-whey.html
DeleteOne circular plywood base, topped with two layers of thick foam, and a piece of warm & natural batting stretched over all that and stapled underneath. Hope this helps. The pattern we used by Myra Mitchell gives all those directions.
Your footstool cover is just beautiful! I've been threatening to piece this since I first saw it several years ago in Kaffe Fassett's book, Passionate Patchwork...where it is called "Turban Footstool". Seems some other quilty project always takes precedence, but one day I will! Great job!
ReplyDeleteLOVE, LOVE, LOVE this. Just ordered the pattern, can't wait to do this for my Granddaughters nursery. Maybe I'll get it done before she is born. :)
ReplyDeleteSounds like the perfect addition to a nursery :) Please send me a photo when it's finished, and congratulations!!
DeleteDo you think this could be made as a pillow without the wooden stand?
ReplyDeleteHi Kathy! You might be able to modify this pattern somewhat to use it as a pillow. But the way it is written, the fabric piece is specifically designed to stretch over the wooden base and firm layers of foam with sides are quite straight. I would recommend other pillow patterns out there like Amy Butler's Gumdrop pillow or Honey Bun Pouf pillow. I've made the Honey Bun Pouf and you can read about that here: http://elsiesgirl.blogspot.com/2014/08/college-apartment-pillows.html. It's has fewer "wedges" than the tuffet, but you could make each wedge a different fabric and get the same effect. Hope this helps! Good luck :)
Delete