
*** EDITED January 12, 2016. Please note that in order for these instructions to work you MUST use the Stack-n-Whack 15 degree Fan Ruler. Other 15 degree rulers have different top and bottom dimensions, and using them will potentially result in a much smaller or even non-existent center circle opening when all your wedges are sewn together. ***
Part 2 starts now! We're ready to start piecing the circles. Layer a background wedge with a colored wedge...

right sides together, and sew a 1/4" seam starting at the wide top edge and ending at the skinny bottom edge.

Press your seam toward the colored wedge...

and make 11 more units just like this, always sewing from the wide top edge to the skinny bottom edge.

Then sew your twelve sections of two wedges into six sections of four wedges, remembering to sew from wide edge to skinny edge and press toward the colored wedge...

then sew your six sections of four into three sections of eight wedges. Press all the seams toward the colored wedges.

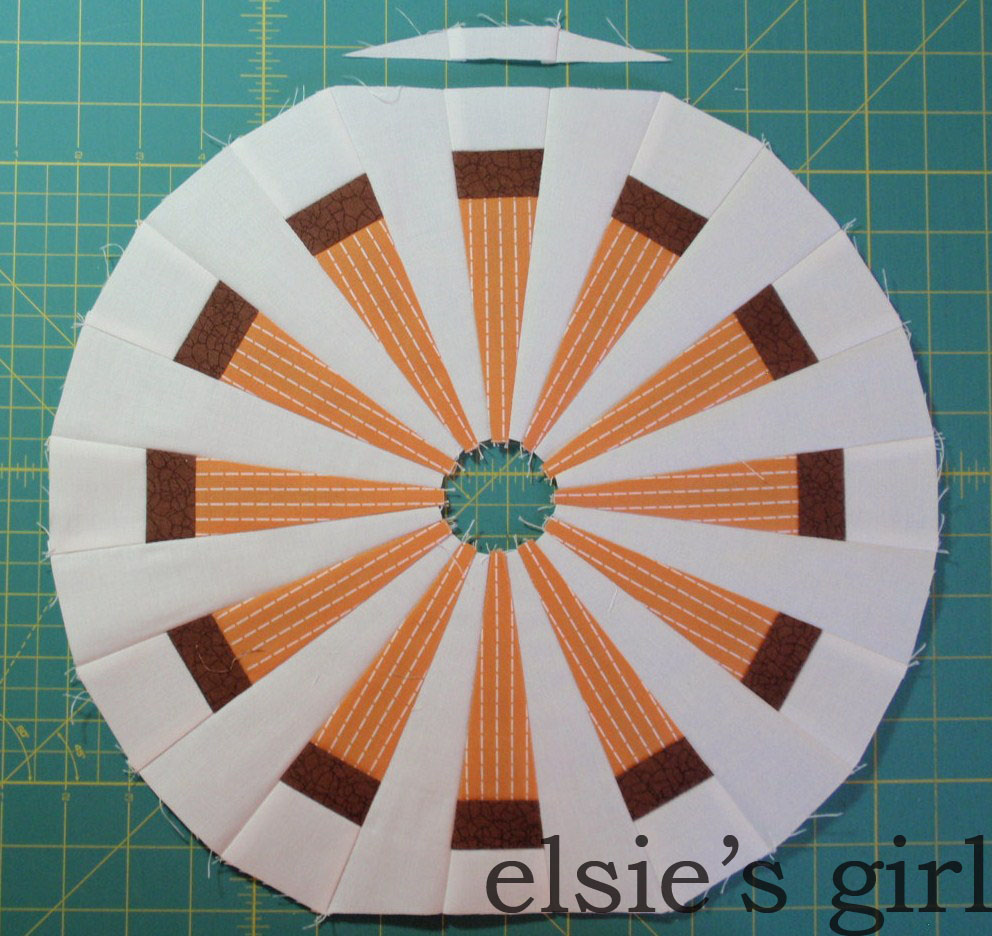
Sew the final three seams making a complete circle...

Now I'm giving you the opportunity to take a little detour because Geta Grama has the original tutorial with great photos and directions on how to cut your completed circle into an octagon here. I used her instructions when I made my blocks. I also took photos of each step of the process when making my blocks, so hopefully between the two of us, you'll be an expert at it! Come right back here after viewing her instructions, and you can read through mine too.
Now let's make this circle into an octagon. Cut a straight edge across three of the wedges...

Flip the unit upside down and cut the opposite edge, again cutting across three wedges...
Cut the remaining sides (at 3:00 and 9:00 on a clock) until your circle looks like this...

Now cut the remaining four curved edges, again cutting across three wedges each time...

And now you've got an octagon! Apologies here; I forgot to snap a photo of this :(
Cut each of your (24) 4.75" background squares diagonally corner to corner...

You're going to sew these triangles to four of the sides of your octagon as shown here. The placement of your triangles is very important! For each octagon with the colored fabrics in the center, place a background wedge at 12 o'clock. For the octagons with colored fabrics on the outer edges, a colored wedge will be at 12 o'clock. Very important for final construction!!

Align the outer point of each triangle with the center of each wedge for correct placement, and then sew a 1/4" seam on all four corners...

Press the seams toward the triangle. The triangles are cut a little too large so they can be trimmed down to the correct size making a perfect square. Align the top and right cut edges with the edges of a large square ruler...

And trim the corner triangle units to make your square edge. Repeat at each corner...

Now you should have a 12.75" square block!

Trace a circle large enough to cover the center opening (mine are a little less than 2.5" diameter) on to the paper side of some fusible web - I use Heat n Bond Lite. I used an unopened roll of lint roller refills as my template - hey, whatever works, right? Fuse the traced circle to the wrong side of your center circle fabric, and then cut out the circle...

Remove the paper backing from the fusible web, fuse the circle to your block, then blanket stitch around the circle...

Stand back and admire your fabulous "Dresden Circle made into an Octagon made into a Square"!!
Make the remaining 11 blocks and sew them into your quilt top!

One more important point. Notice in the quilt top how blocks with colored fabrics in the center are alternated with blocks where the colored fabrics are on the outer edges? And remember when I said you need to be careful about your placement of the corner triangles on each type of block?? Here's why. In order to give the Sunburst "circles" the appearance of floating and spinning, you want the colored wedges of each Sunburst to align with the background wedges of adjacent circles. That's why your corner triangle placement is key.

It also makes piecing the blocks so much easier since your seam allowances are pressed so that they will lay on either side when seamed!

Lastly, add the 2" cut border strips to each side of your quilt. You'll have to join three of the strips for enough length to be able to cut the borders for the two long sides of the quilt top. Add the long sides first, pressing the seams toward the border, then finally add the top and bottom borders. Voila - quilt top complete!!
Let me know if you have any questions about these directions. And I'd love to hear from you if you make one of these Sunburst quilts :) Send me a photo!
Now I'm off to decide on a quilting pattern for this baby quilt.
Thank you all so much for the wonderful response you've given to this quilt. It truly makes my day every time someone takes a few moments and leaves a comment :)
Very easy instructions and a very cool quilt!
ReplyDeleteThe ruler...... where do you get it?
ReplyDeletethanks so much for taking the time to write a tutorial!!! this is on my list of quils-to-do...
ReplyDeletei love it!
thank you so much! I admired this quilt on getas site and now I feel confident to try it!
ReplyDeleteI love it!!! Thanks for the wonderful tutorial. I sooooo want to make one! Add to list: check!!
ReplyDeleteThis is just the cutest pattern - thanks so much for the tutorial. No excuses not to make it now...!
ReplyDeleteI love Greta's quilt, and I love yours just as much. Very tempted for this to be my next 'me' quilt!
ReplyDeleteI love this design! Thanks for the great post!!!!
ReplyDeleteI am so excited to find this pattern and your instructions! I acquired a bunch of feedsack material at an auction, and I think they will look great in this pattern.
ReplyDeleteThank you so much for taking the time to make such a wonderful tutorial. I just found this and YOU via a post today by Pat Sloan on FB. Wow...a new blog to follow...yey! Will be back for sure!
ReplyDeleteDresdens are my fav of all time. I am gonna make this one. Thanks
ReplyDeleteI found your tutorial through a link at Pinterest, and I'm so excited.
ReplyDeleteThis is not only do-able, but it's beautiful.
Thanks so much for all of your work!
Glad you found it VAMama! If you make one, please let me know and send a photo :) Let me know if you have any questions or problems!
Deletewow, what a wonderful quilt and a great tutorial. Im so tempted to make this quilt.
ReplyDeletethanks so much for sharing.
So, this is how it's made. Always wondered about it. Thank you, thank you so much for the easy-to-follow instructions. You're great!
ReplyDeleteThanks Rosebud! I hope I've inspired you to make one of these quilts! If you do please let me know and send me a photo :)
DeleteI too found your quilt and tutorial through Pinterest. Thanks for a great tutorial! This quilt has been added to my "to make" list of quilts!
ReplyDeleteI cannot wait to try this quilt. Your tutorial is incredible!
ReplyDeleteI also found this on Pinterest and am making it now. Thanks for the great tutorial!
ReplyDeleteYour photographs and tutorial inspired me to try this quilt for the birth of my great niece. I have run into a tough time joining my 3 wedges to make the sunburst. My local quilt shop did not carry the stack and whack ruler so I purchased the Creative Grids 15 degree triangle ruler but my seams are so tight at the narrow end of the wedges. Any suggestion would be very much appreciated.
ReplyDeleteHi Jenny,
DeleteI tried to email a response to you, but you are set up as a "no-reply" commenter on Blogger which means I don't have any idea where my email response to you ended up.
Anyway, I'm sorry you're having problems with this quilt block. I actually received an email from another quilter who tried to use a Creative Grids 15 degree ruler and had a similar problem.
I believe different rulers may have a narrower tip than the Stack n Whack, thus causing the lack of a center opening you mentioned. The width of my ruler at the skinny tip is approximately 3/4". The center opening of my finished circles is 2", and around that center edge there is a scant 1/4" of each individual wedge showing.
If the ruler you are using is truly 15 degrees then mathematically speaking you need 24 wedges to make a circle. But if the narrow edge of each of your wedges is more narrow than mine cut using the Stack n Whack ruler, the resulting center circle is going to be much smaller or even non-existent.
Can you experiment with cutting some more wedges from scrap fabric? Try to find the marking line on your ruler that will give you a 3/4" cut narrow edge and use that rather than the ruler end. I'm hoping this makes sense; it's so difficult to try and explain things without photos.
I hope this helps you. The only other advice I can give you is to double check your seam allowances. A scant 1/4" really works best with this block.
Best of luck! Let me know what happens next.
Shelley
Thank you for your reply and suggestions. Knowing the narrow edge should be 3/4" made all the difference. I have taped off my ruler and after making the sample, I feel confident to continue with the creative ruler. Many, many thanks, j
DeleteThat's great news, Jenny! Let me know how your quilt turns out :)
Delete