Pages

Showing posts with label tutorial. Show all posts

Monday, February 22, 2016

selvage spools made easier

The Crystal Lake Modern Quilt Guild is hosting three block lotteries this year, and the first one takes place in April. We chose the Selvage Spools block from this Riley Blake 2013 Block of the Month program.  You can download and print the Riley Blake block directions here, but you'll probably want to keep reading to discover an easier way to make this block.


The block is composed of four 6" spools to finish at 12" square (12.5" unfinished).

The original pattern uses a template and partial seams - no thank you.  When Lorrie and I met earlier this week to sew the sample blocks for our Sunday guild meeting I made some quick pattern modifications to make it easier.  Easier = Better, am I right?!  Here is my pattern tester block - spot on at 6.5" unfinished :)


I created this tutorial a little differently by adding text to each photo of the steps.  I hope you'll find this easier to follow :)

The materials you'll need for one block:

Using a pencil lightly mark a diagonal line on the wrong side of each 2" square.
Choose selvages with fun words and lots of color dots!


The sewing instructions begin here:

You'll want to center the wording/color dots on the background square.

I sewed this piece about 1/8" from the bottom of the background square so the words wouldn't be cut off later in a seam allowance.

You can choose to cover the printed fabric area of the first selvage or not.

We used 6-7 selvages per spool.


Press these seams toward the background fabric.

Make sure you carefully place the marked diagonal lines as shown.


Press away from the center.
Your spool block should measure 6.5" square now. 
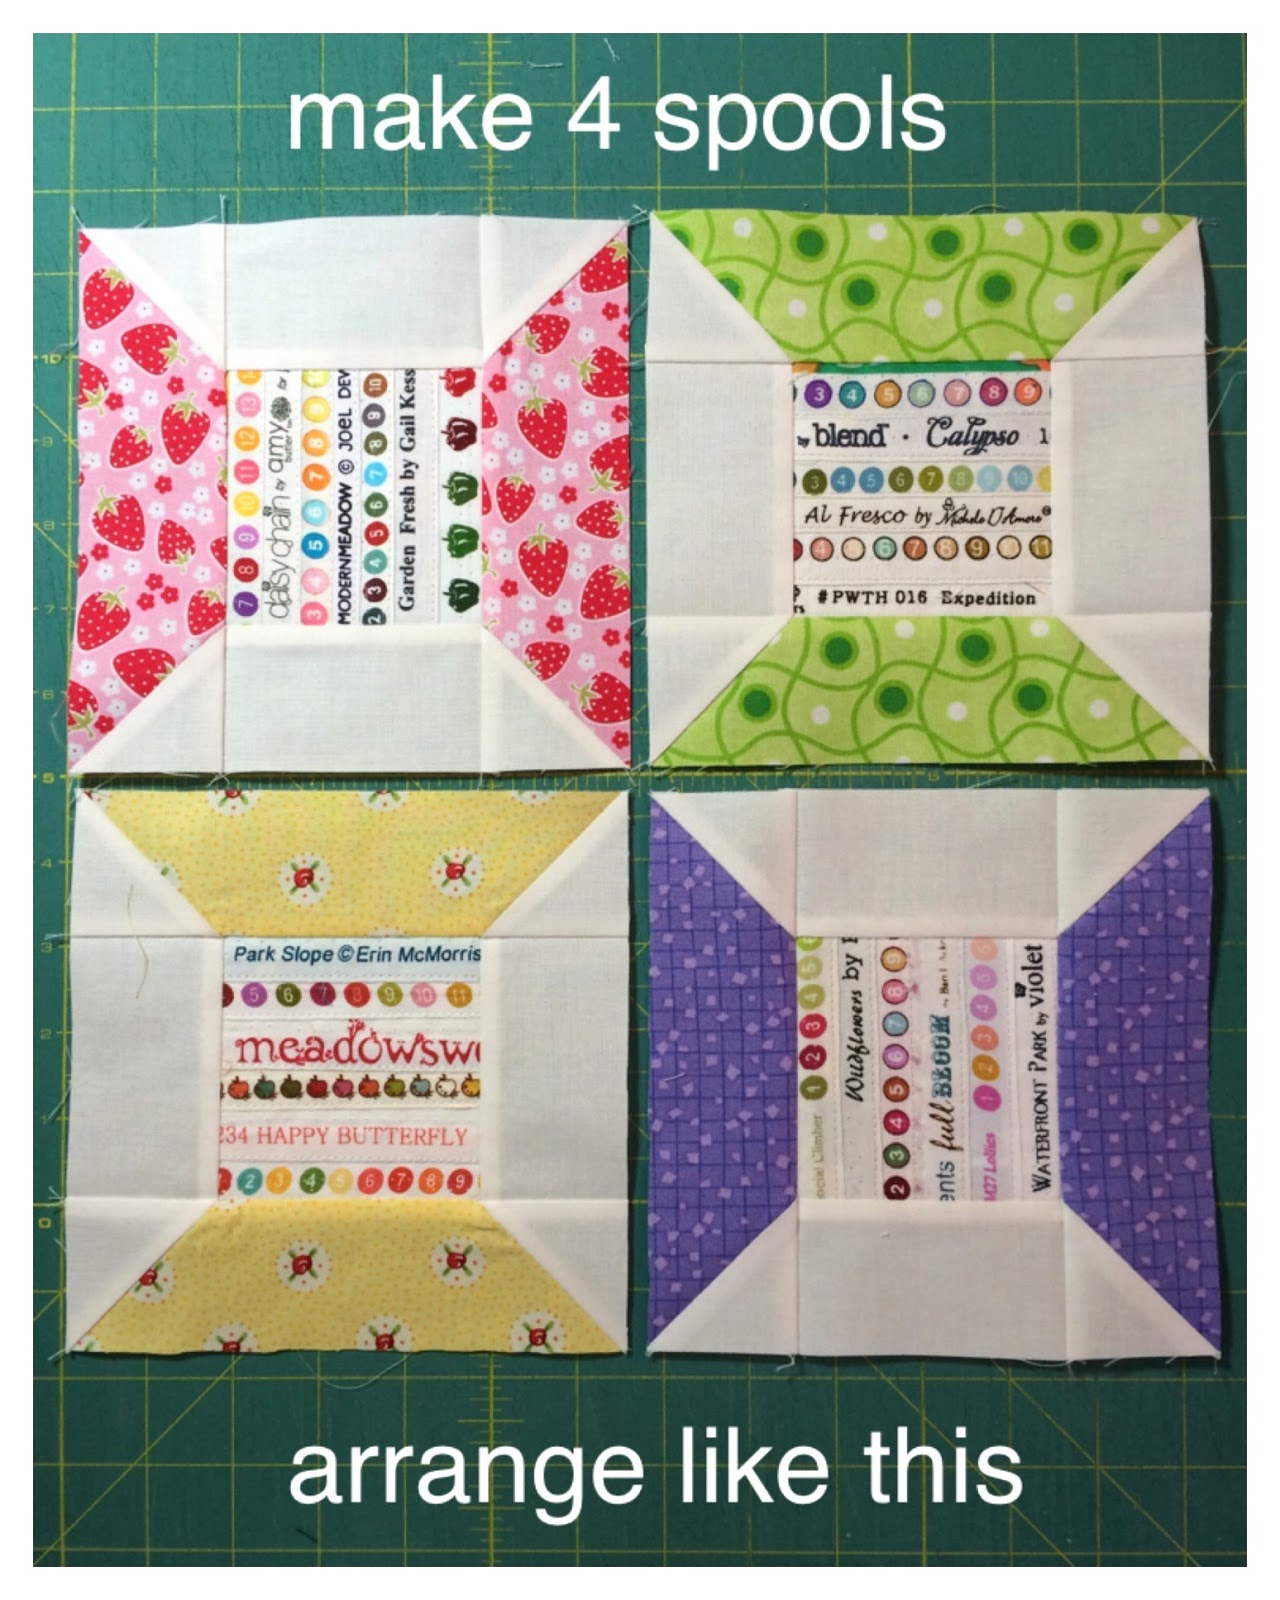

These final seams are all pressed toward the spool end - not the background fabric.


And there you have it - a 12" square finished selvage spool block!


Thanks to Riley Blake for the original pattern and inspiration for this fun quilt block!

Monday, February 3, 2014

Valentine Button Heart - a free pattern for you

Happy February!

I created this little piece of stitchy love and wrote a pattern that I'm sharing here with you.


Tuesday, July 10, 2012

Sunburst baby quilt details - Part 2

If you're just joining me for the Sunburst baby quilt tutorial, see Part 1 here.

*** EDITED January 12, 2016.  Please note that in order for these instructions to work you MUST use the Stack-n-Whack 15 degree Fan Ruler.  Other 15 degree rulers have different top and bottom dimensions, and using them will potentially result in a much smaller or even non-existent center circle opening when all your wedges are sewn together. ***

Part 2 starts now! We're ready to start piecing the circles. Layer a background wedge with a colored wedge...


Monday, July 9, 2012

Sunburst baby quilt details - Part 1

As promised, I've got some details for you about the way I constructed this quilt top. The blocks are basically a variation of a Dresden Plate. But the entire block (with the exception of the center circle) is pieced into a square, rather than appliqued on to a background.


Monday, January 16, 2012

machine binding explained

Several times on this blog I have talked about attaching quilt binding entirely by machine. Last week I finished another quilt binding like this and actually took some photos to show you how I do it.

Disclaimer here: this method is nothing revolutionary (and I didn't invent it); it's just a mixture of different techniques that I've read about or seen demonstrated, and the method that works best for me :)

I always cut my binding strips at 2.25", and sew them to the front of the quilt using a 1/4" seam. I usually leave a little bit (1/8 to 1/4") of the quilt backing and batting to wrap in the binding for extra fullness around the edges when hand-finishing only. When I machine finish, I trim all the excess backing and batting away so all the layers are flush with the binding raw edge.


From the front of the quilt, I iron the binding away from the quilt top around all four sides. Make sure to remove any markings from your quilt top that may become permanent from the iron heat! Use lots of steam with a very hot iron.


Then flip the quilt over so the backing is face-up and press the binding finished edge down so that it overlaps your stitching line. Again - lots of steam.


Make sure to press nice mitered corners, so your sewing machine catches all the edges with your stitching.


Pin from the front at 3" to 4" intervals.


Check to be sure your pins have caught the finished edge of the binding on the back.


Now you are ready to sew! I have a "quilt in the ditch" foot attachment for my machine that I like to use since I'm not very accomplished at stitching in the ditch. If you have one too, give it a try. If not, just use any foot that will allow you to see your needle clearly so you can place your stitches directly in the ditch between the quilt front and the binding.


Stitch all the way around your quilt, removing the pins as you come to them. Now check it out - you can barely see that stitching line from the front!


And on the back, the corners and all edges are securely stitched down!


Check all around the back of your quilt to see if you skipped over any edges. Sometimes I don't get my stitching quite close enough to the ditch in places, and on the back there is a small section where I haven't caught the binding. Now worries, just put it back under the needle and stitch closer to the ditch and you'll probably catch it on the second try.

The pressing is really the key here. If you've got your binding pressed around to the quilt back slightly overlapping your initial stitching line, you'll have great success and be a pro at this in no time. Practice on something small for your first attempt - a place-mat, pot holder, mug rug, or something of that sort.

If you give this a go, please drop me a note or comment. I'd love to hear about how you fared. Have questions or need more clarification? Let me know about that, too.

Good luck and Happy Binding!

Wednesday, September 14, 2011

fat quarter drawstring skirt

My friend Stephanie over at Venus de Hilo makes the most fun fat quarter skirts that I have long coveted, and now she has put together a great tutorial for making her easy drawstring skirt from six fat quarters. Recently my friend Andrea and I had a sewing day to make these skirts for ourselves.

Stephanie's instructions are well written and the diagrams very helpful, especially when it comes to making the pattern. She provides a formula that allows you to tailor the pattern based on your hip measurement. We each created a pattern on freezer paper - this was the most time consuming part - but the pattern can be re-used every time we want to make another skirt.

Here is the front view of my skirt. I used six fat quarters from Prints Charming that I bought a couple of years ago with the intention of making a bag. They look so much cuter as a skirt! My husband liked it, saying that it was "cute, fun, well-fitted, and just on the verge of Laugh In, but in a good way." I think he means my fabric choice :)


And this is the skirt back view. You can really only distinguish five different fabrics because the sixth is used for the drawstring and drawstring casing.


I have a bit of an odd shape with regard to my waist/hip ratio. In other words, my hips are larger than they should be to correspond proportionally with my waist. So when my skirt was finished, I had quite a bit of fabric that was gathered in by the drawstring, which is not a very flattering look for me. So I cut the waist in much farther on my pattern, using a fitted skirt from my closet to gauge a better waist measurement. I had to rip out most of the seams to cut the waist down to a better size for me, but now the whole thing is reassembled and ready to wear. Assembly time from pattern making to ready to wear was about 4 hours. My re-do of the pattern and skirt waist took me an additional 90 minutes, but now I've got a custom pattern that I can use again and again to make multiple skirts from all those teetering stacks of fat quarters in my fabric closet! I even managed to wear my new skirt a couple of times before the fall chill hit the air here in the Midwest, and I received many compliments :)

If I knew then what I know now, I probably would have started out with muslin, or used fat quarters that I had no intention of ever wearing, to test out my pattern. Then I would have avoided the unsewing steps, and I probably could have had another set of fat quarters assembled into a skirt from the revised pattern in the same 90 minutes it took me to re-work the original.

Thanks, Stephanie, for a thorough and well-planned tutorial! I do love a great skirt!

You can see all of Stephanie's skirts (and my new one too) over here at her flickr group.  If you're inspired to make a skirt (or three or four) from her tutorial, please let both of us know and share your photos!

Sunday, December 12, 2010

crafty weekend how-to

3 girls + 2 hours + 1.5 pounds clear glass gems + old catalogues** + scissors + hot glue + magnet tape =


138 mini-magnet gifts for friends, family and...


a couple of sets to keep...

Shoes (very girly of course!) and Paris (ooh la la!)


You'll need:

* a bunch of dome-topped, flat-bottom, clear glass gems from the craft store (the kind you put in fake flower vases. I bought a 3 pound bag from Michaels for $6.99)

* a roll of 1/2" wide adhesive magnetic tape (also at Michaels - looks like a skinny roll of masking tape. I bought the jumbo roll for $5.99 and now I have enough of this stuff to make a bazillion magnets, so maybe you don't need the jumbo size - LOL!)

* a low temp hot glue gun and scissors

* several pages with cute, tiny images from magazines or catalogues

We just cut small circles of cute images from the catalogues, put a blob of hot glue on the flat bottom of the gem, and pressed the gem back onto the image. I found that applying even, firm pressure caused the glue to spread to the edges, resulting in less image distortion from the front. (But hey, they're magnets, just jump in there and do it!) You may have to trim some of the catalogue paper from the back after gluing - it tended to hang over a bit sometimes because each gem is a little different sized. Then cut off a small square of adhesive magnetic tape, and stick it to the back of the gem. Repeat 99 times for 20 gift sets of 5 magnets each :)

We made a couple of practice ones at the start to see how much glue was needed. Another helpful tip is that some of the gems seemed to have an iridescent coating on the back, making it more difficult to see the image, so we tossed those aside and didn't use them.

Let me know if you make any of these, and send me a photo! And if you come up with other catalogues/magazines with great images, pass that info to me as well :)

A big THANK YOU to Heather at {House} of A La Mode for this great idea!

**catalogues used: Pottery Barn Teen, Vera Bradley, and Hancock's of Paducah

Monday, April 12, 2010

New Spring Pillow finished!

You may remember that I took a couple of hand-sewing projects with me on vacation in late March. I am happy to report that one of them is now complete! Due to my recent convalescence (foot issues... see earlier post if you need the details), I was able to finish all the hand applique, and today I headed out for a zipper, piping, and a 16" pillow form to complete the job. Isn't it so spring-y?! I love, love, love the way it turned out!
Dritz Wash-Away Wonder Tape is my new favorite notion. It is a 1/4" wide, double-sided adhesive that makes adding piping, zippers, and machine-finishing your binding SOOO much easier!

You simply peel what you need away from the roll and press it onto the fabric where you want to hold your piping/zipper/etc. Here I have applied it to the raw edge of my quilted pillow front so I can hold my piping in place without pins.

Next you just peel away the paper backing to reveal the front side of the adhesive...

press your piping down and you are ready to sew!
PEACOCK UPDATEI am happy to report that the wandering peacock I told you about last week was reunited with his owner. My local paper reported that a nearby family keeps two male peacocks, and both went missing that day. The one I saw was captured by Animal Control the same day, and the other male was apprehended the next day. The owners (who live less than a mile from my house) were keeping them in a 7 foot high enclosure. They are planning to make it higher... and get a female so the guys don't need to go out looking for chicks :)

LinkWithin

Related Posts Plugin for WordPress, Blogger...