Pages

Friday, November 20, 2015

slow sewing steady progress

25 done, 7 to go...


The flower garden blocks are nearly all complete! All of the fabrics have been chosen and cut, so now it's just a matter of sticking with it. I usually sneak in a bit of hexie sewing time on my Monday morning coffee talks with Thing 2 :)


My quilt guild has been hosting a couple of evening meet ups each month for hand sewers (again at Starbucks) so that provides another opportunity for progress.


The background hexies aren't nearly as exciting as the flowers, but I've got about 40% of those sewn together. I'm using a coloring chart to keep track of the sections; this should make it easier to put the whole thing together when all the components are finished!


I don't have a count of how many background hexies are basted and ready to go, but there is a bag full.  And on a recent evening in a fit of paper-punching madness I punched out 622 foundation paper hexagons. Carpal tunnel, here I come!!


Some of these counts are "best-guess"...

  • Center Star Colored Hexagons completed: 151/151 (100%)
  • Flower Colored Hexagons completed: 475/608 (78%)
  • Grey Background Hexagons completed (guessing): 218/532 (40%)
  • Total Hexagons completed: 874/1291 (67.6%)

You can read more about the method I use to English Paper Piece (EPP) these hexagons and see the project pattern in this post.  Previous progress updates can be viewed here.

I'm a little shocked at how diligently I've managed to stick with this project.  I hope my persistence continues!!

Thursday, November 12, 2015

my signature color

Whoa - I finished a quilt almost three months ago and forgot to tell you about it!  This is my Triple Star quilt with lots of fuchsia/magenta/pink so I'm calling it "My Signature Color".


During 2014 I was a member of an online bee group - Modern Instabee Hive 15 - that used quilt patterns from the book Modern Bee: 13 Quilts to Make with Friends by Lindsay Conner.  November was my month for the 11 other members to make blocks for me, and I asked them to use a variety of low volume fabrics for the background and loads of darker pinks for the 16" Triple Star block.  Using these fabrics from my stash (minus the turquoise prints) I made a couple of example/inspiration blocks.


During the months November 2015 - February 2015 Triple Star blocks from all over the continental US and Canada arrived!


The book pattern called for finishing the quilt with plain 2" sashing between the blocks and a couple of borders around the 3x4 block grid, but I changed it to include 4" sashing with additional stars as the cornerstones and no borders. Because I'm contrary like that. And because you can never have too many stars.  A sprinkling of turquoise cornerstone stars breaks up all of the pink.


The quilting was done by Carol Linder in Hampshire, and I chose the "Cracker Jacks" pattern with fuchsia thread - naturally!  The leftover black and white floral backing from this quilt made a fun (and free!) binding.


For the backing I used Wide Back Text in white from Windham Fabrics.


ALL the color names on the back of this quilt!


Many, many thanks to the members of Modern Instabee Hive 15! This is one of my all time favorite quilts, and what a great experience it was to work with all of you!

** I've been busy with some secret Santa sewing the past few weeks that I won't be able to share until January. But Carol currently has my Red Hot Dreamy Hexagons quilt top in her queue, and I've been diligently working on my Flower Garden Quilt. So there are still projects for me to share with you in the few remaining weeks of 2015 :) **

Friday, October 2, 2015

fall coffee dates

Last fall I started going to Starbucks every Monday morning with Thing 2 before she went to school. It was a nice way to start the week, and we had many great conversations over our mochas, peppermint hot chocolates, and chai tea lattes. We made it there every Monday morning throughout her entire senior year of high school.


We've decided to continue the tradition this year. I visit the usual location near my home, and she goes to the one closest to her college dorm. We chat on the telephone instead of face-to-face, but it's still a great way to start the week and stay connected :) This week I brought along a book to fill the time while I waited for her. (By the way this a very good story - one of the main characters works at a quilt shop and actually lives over the shop with her young daughter!)

I really love the look of the new fall Starbucks cups, and as I sat there reading and enjoying my hot tea I thought, "these fall cups could really use a matching coffee cup cozy!" Since I knew the perfect fabric scraps were waiting in my stash, I immediately started cutting once I was back at home. My friend Lorrie created and published the fantastic pattern and tutorial on her blog at SewMod.


My button stash is not so well stocked (sadly), so once all the fabrics were cut I headed out to purchase some fun buttons and the elastic hair ties needed. Shopping for those supplies took longer than actually sewing the cozies!  Here they are all sewn and ready to go!


They will fit all sizes of Starbucks hot beverage cups - tall, grande, and venti.


I buttoned them all and stood them upside down so you could see the fun lining fabrics too :)


Thing 2 really likes the one on the left (so I'll be sending it in her next care package), while I'm pretty attached to the one on the right. I haven't decided what to do with the other five - probably give them to my coffee loving friends!


You should check out Lorrie's tutorial and make some for yourself and your friends! Then make a coffee date with someone you love :)


Tuesday, September 8, 2015

pillow sham for epic college map quilt

As promised, here are the details on the pillow sham I made to coordinate with the Epic College Map Quilt...


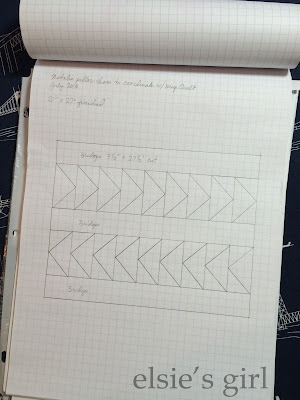
It measures 21" x 27" to fit a standard sized bed pillow. I came up with a couple of different design layouts utilizing some of the 100 flying geese blocks left over from making the quilt. Thing 2 liked this first design best...


Which surprised me because I thought for sure she would choose this one since it more closely mimics the quilt...


The entire sham was sewn with leftovers from making the quilt :) Using the quilting designs Carol put on the map quilt as a guide, I free motion quilted the same loopy motif in the flying geese units and added horizontal lines and key words in the larger bridge fabric areas to personalize the pillow cover and tell a bit of "her story".


Yep - her name is Natalie, and she intends to study engineering physics. She is a whiz at physics and also really enjoys studying calculus and mathematics. Just thinking about studying those topics kinda freaks me out, but not Thing 2!


She plays both the trombone and cello. Her cello (named Pascal) moved with her to college and is currently occupying a very large portion of her dorm room closet when she isn't practicing :)


Ballet and lyrical dance are two of her other favorite loves. She is taking a ballet class this semester at school and practicing with a contemporary dance performance group on campus for a show in November. So it's not all math and science all the time!


The pillow top was quilted with my tried and true combination of a layer of plain white prewashed flannel (instead of batting) and a muslin backing. Pillow tops generally don't require the same loft as quilts, so a layer of flannel is perfect. The green borders of the pillow top are a Peppered Cotton from Studio E fabrics designed by Pepper Cory, but I'm unsure of the color number/name.

An envelope style closure on the back finishes the pillow sham perfectly.


Natalie is currently having the time of her life meeting new friends and learning new things about herself and her favorite school subjects. It's a new chapter of life for her, and for me too because after 21+ years it's just me and my husband at home again. It feels strange and exciting, sad and joyous all at the same time to have sent both of our girls out into the world and to watch them from the sidelines. New adventures are out there for all us... Onward!

Thursday, August 27, 2015

epic college map quilt complete!

I could not be happier with the way this quilt turned out!  It is exactly as I pictured it in my mind thanks to the amazing quilting done by Carol Linder in Hampshire, IL.


The map portion is quilted in a 3" grid to mimic the latitude and longitude lines on a wall map. Thing 2 made a list of 40 city and country names that she wanted to be placed randomly over the quilt top in lower case script - places she has visited as well as places she hopes to visit in the future.


Carol had some difficulty finding a script font that would string letters together to form words; all of the script fonts she already owned would stitch a hard start and stop for each letter. That's a lot of starting and stopping spread over 40 words!


But she persisted and was able to find this font, and it's perfect stitched in medium grey thread!


The final requirement was that the words interrupt the grid lines and be randomly scattered across the quilt in both the horizontal and vertical directions but only in the "ocean" areas, not on the continents. And again, Carol rose to the challenge plotting out all the lines and words on her computer to perfect their placement.


She had to quilt all the lines in one direction first, then remove the quilt from the long arm and rotate it to quilt the perpendicular lines. It all worked perfectly!


A repeating looped stitching pattern in olive green thread fills all of the flying geese units.


Bridges on the back symbolize Thing 2's interest in Civil Engineering and Physics.


We haven't washed the quilt yet, so it's still crisp and crinkle free, but I'm anxious to see how it looks after washing.


That will have to wait a few months though, because it's living in it's new college home now.


I asked Thing 2 if she was disappointed that more people wouldn't be able to see her quilt since the bed is lofted so high. Her response - "Mom, so many more people are going to see the quilt on your blog than would ever see it here on my bed!" :)

Next time I'll show you the coordinating pillow sham I made with some of the extra flying geese units.

If you would like to know more about how I created this quilt top, you can read these earlier posts:

Tuesday, July 28, 2015

slow sewing update

17 done, 15 to go...


I've passed the halfway point in making these hexagon flower garden blocks!  All of those background minutes spent waiting at doctors' offices and in front of the TV in the evenings have added up to great progress on this quilt.


It's still very much a long term project, but Kaffe, Amy Butler, Anna Maria Horner, Juliana Horner, Denyse Schmidt, and Art Gallery are all providing me with bright, beautiful colors to build these flowers a handful of hexagons at a time.


My hexagon papers and fabrics will be joining me on a road trip in a couple of weeks as my family heads out for our summer vacation.


Maybe I'll try to work on the grey background patches during that trip.  There are oh-so-many of them needed, and I don't want to save them all until the end.


In my previous post I said I wasn't going to use a count to track my progress, but I couldn't resist!
  • Center Star Colored Hexagons completed: 151/151 (100%)
  • Flower Colored Hexagons completed: 323/608 (53%)
  • Grey Background Hexagons completed: 49/532 (9%)
  • Total Hexagons completed: 523/1291 (40.5%)
You can read more about the method I use to English Paper Piece (EPP) these hexagons and see the project pattern in this post.

Tuesday, July 21, 2015

one hour basket organization

Let's talk about sewing space organization - the ever-elusive, never-quite-all-the-way-there, ungettable-get of my sewing life. Yeah, keeping the sewing room tidy has long been a challenge for me.

Sewing room disarray led me to check this book out of the local library recently and read it cover to cover one lazy weekend afternoon.  If you haven't yet read this book YOU SHOULD!  Written by a professional organizer, it is brimming with great advice specifically for us quilters and our fabric stashes, bins of UFOs, drawers of tools and gadgets, and teetering piles of magazines and books.  (Or is that just me?)


Long story short, it's going to take a multi-day, remove everything from the room, and start the organization from scratch episode to get my sewing room into shape.

Since that's not going to happen this summer when there is too much fun to be had, I decided to take a few baby steps using one of my favorite pieces of advice from Chapter 5: Project and UFO storage - use a system of bins or boxes to contain the fabrics and patterns for each project currently in progress (easy) and maintain the organization by putting away all the materials you've worked with at the end of each sewing session (not so easy for me).  For someone like me who jumps around from project to project, keeping project pieces together is crucial to maintain a sense of order.

I'm a "piler" by nature, so these project boxes need to be easy access for me to use them as intended.  No lids, clasps, etc to get in the way of just dumping the pieces in after time spent sewing.  The One Hour Basket to the rescue!


** Updated 11-16-2017 The pattern/tutorial by Hearts and Bees is no longer free, but you can purchase it for $1 here on Craftsy.


It truly is a one-hour basket - the first one I made took only one hour and four minutes!


I made four total for my sewing room from 2 half-yards of decorator weight fabric, 4 fat quarters of quilting weight cotton, 2 yards of fusible fleece, and about 1 yard of lightweight fusible interfacing (for the handles).


Each finished basket measures 10" wide x 7" tall x 5.5" deep - an excellent size to hold your pattern and fabrics for a project in progress or in queue.


I changed a few things in the pattern after making the first basket:
  • Step 1 - fuse the lightweight interfacing to the bag handle pieces - they'll be less floppy in the end.
  • Step 2 - fold and press the handle rectangles in half lengthwise, and then fold each raw edge into the center fold and press so the finished handle measures about 1.25" wide. The pattern tells you to fold and press so the handle finishes at 1.5" wide, but I think that's more trouble than necessary. 1.25" width is good enough for me.
  • Step 3 - leave a 4" opening in the bottom of your bag interior to make turning right side out at the end easier.
  • Step 8 - Press the interior and exterior corner seams in opposite directions to help your basket sit flat upon completion.


For the finishing touch, I fused and stitched an elsie's girl label to the front of each basket. Create your own fusible personalized labels with this tutorial from Lorrie at SewMod.

My four baskets are all filled with projects in progress, and now I've got a small system in place to keep them each separate and contained.


I even made two additional one hour baskets using these fun fabrics!


The teal lined basket was filled with goodies and given away as our guild's June door prize, and the purple lined version was my contribution to the June CLMQG fabric container swap.


Do you have any sewing room organization tips for corralling your works in progress?

LinkWithin

Related Posts Plugin for WordPress, Blogger...