Pages

Showing posts with label Thing 1. Show all posts

Friday, September 19, 2014

college apartment pillows - part 2

I'm finally back to finish reporting on the college apartment pillows that I helped Thing 1 make last month.  The round pillow was made using an Amy Butler pattern, and you can read more details about the construction of that one here.  But today I want to tell you about the other four pillows we made.  I did most of the cutting, and Thing 1 did ALL of the sewing.


The two square pillows were sewn with home dec weight fabric we found at JoAnns.  Each of these 27" floor pillows has a beige hemp piping/welting trim around its outer edge.  The inserted pillow forms have a box edge instead of the usual knife edge, so the covers are well stuffed - just the way you want a floor pillow!


They also have concealed zipper flaps on the back to hide the zippers and prevent scratching either the floors or people sitting on them :)


In this photo you can see the standard 22" zipper beneath the flap.  I always use this tutorial for placing a lapped zipper on the back side of a pillow - it has several photos and excellent directions that guide you through the entire process.


The two lumbar pillows each measure 14" x 28" and are also made using a home dec weight fabric from JoAnns.  I liked this fabric so much that I bought extra yardage to re-cover the cushions on a rocking chair here at my own house!


Thing 1 decided to sew invisible zippers into the 14" ends of these two pillows.  She's a zipper pro!


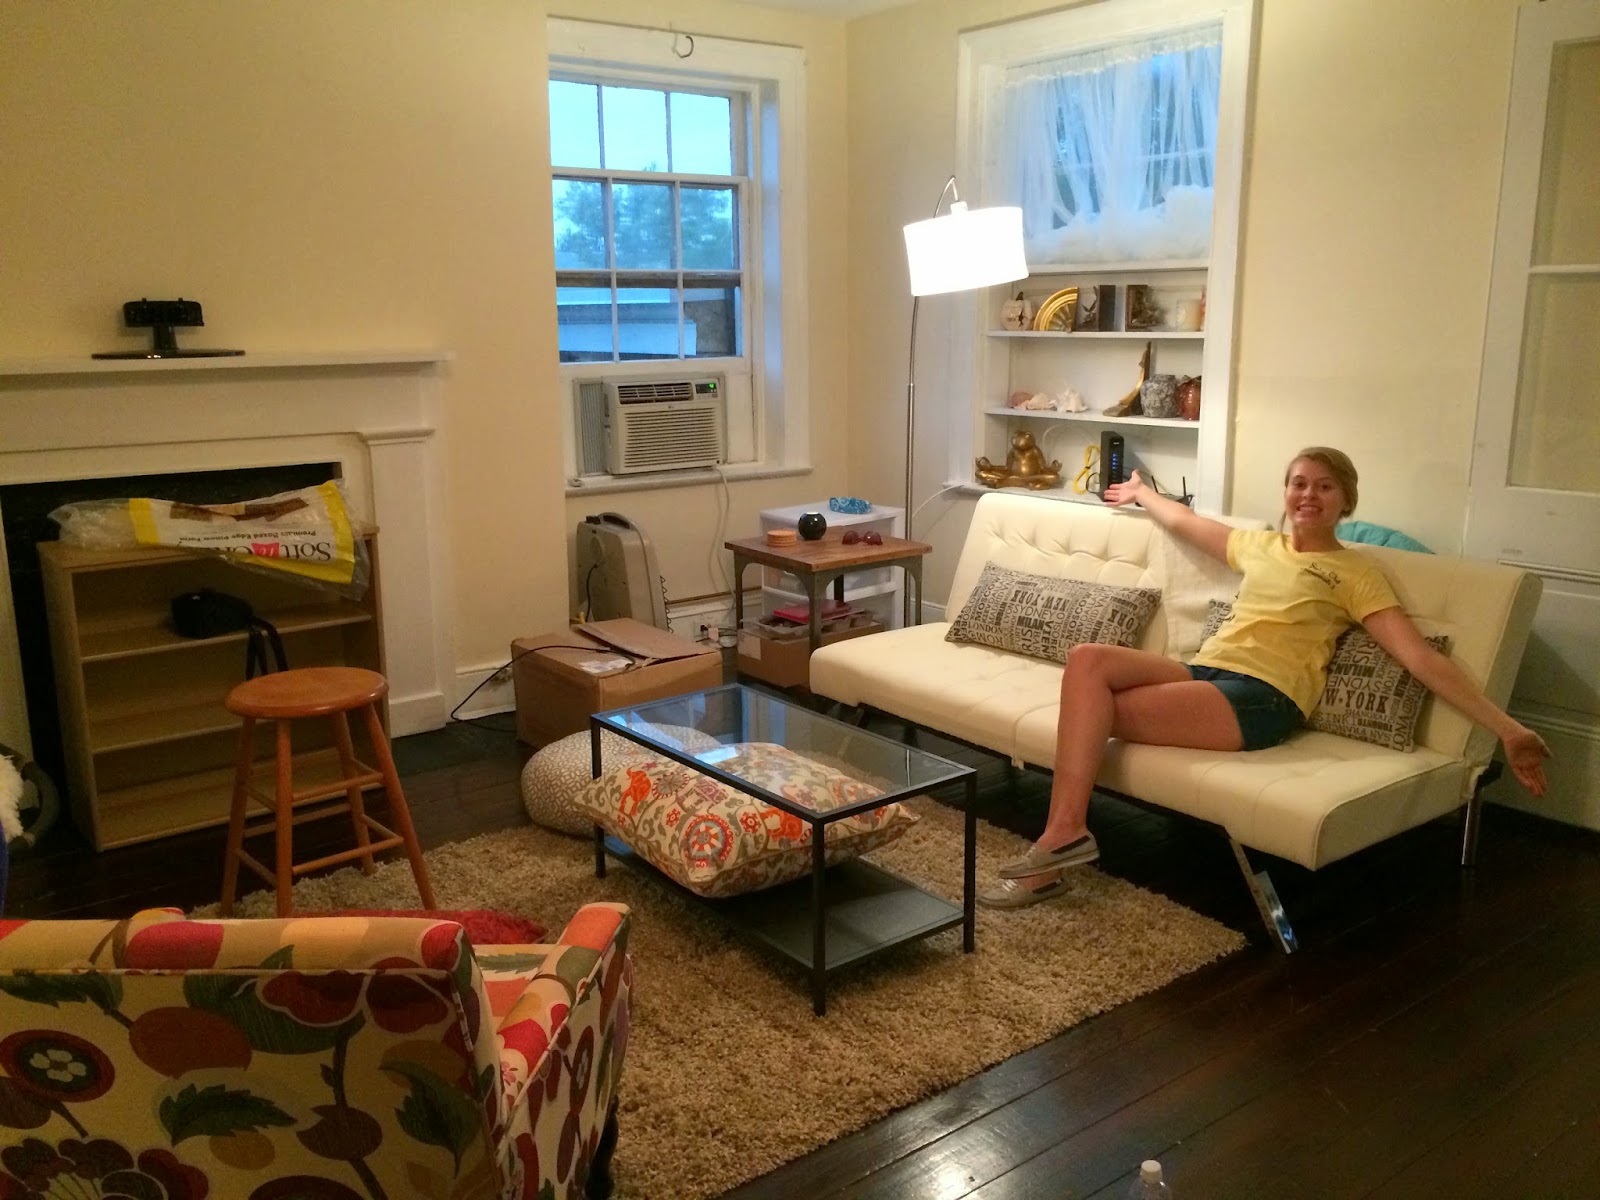
All of these gorgeous pillows are now decorating Thing 1's college apartment.  Needless to say it's a very stylish first apartment.  This photo was taken at the end of two days of non-stop painting and moving furniture.  A lot more decorating has happened since then, but you get the general idea.


Here we are outside the building which dates from 1850.  It's on an all brick street with brick sidewalks - very charming :)


Currently I have a cut of home dec weight fabric just waiting to be made into another HoneyBun Pouf pillow for a class sample.  It's on the top of the project pile so it stands a decent chance of completion before the year ends ;-)

Enjoy your weekend!

Friday, August 29, 2014

college apartment pillows

It's been a fun summer with little bits of sewing here and there, but last week was VERY productive! Thing 1 is preparing to move into her first apartment at college, and she needs some fun pillows to decorate her new space. She did most of the sewing, I did most of the cutting, and with a few days of  intense work she has three new seriously stylish floor pillows...


And two lumbar pillows for the couch/futon!


I'm going to dive right into the "how-to" for the most difficult pillow - the 24" round Honey Bun Pouf pillow made from Amy Butler's pattern in this fun geometric print we found in the Home Dec section at JoAnn's. The pattern calls for 2 1/8th yards of 54" decorator weight fabric for the 24" size, but even after careful fussy cutting to match the print I still have 3/4 yard leftover. That seems an excessive amount of extra fabric, but I guess that just means a few more toss pillows :)

The pattern also gives directions for constructing the pillow with quilting weight cottons, but you need to back each pillow segment with heavier weight cotton canvas to provide the required sturdiness and weight for a floor pillow. In my opinion the home dec weight was perfect - not too bulky to work with , one less construction step, and the finished product feels durable.


First step - trace the wedge template provided with the pattern. I made 5 pattern tracings on freezer paper so I could iron the patterns to the fabric for easy cutting without pinning. 30 total wedges are needed to make the pillow - yikes!


Mark your pattern pieces with information from the pattern. This is an OCD type habit that I have, but it has saved me from making cutting mistakes several times. The information also helps if your patterns get separated from the instructions, and you find them two years later and wonder "what the heck are these?!" Ask me how I know this ;) The center of the pattern outer edge is marked to help me with the fussy cutting.


Since this geometric print is a mirror image from left to right and top to bottom I was able to stagger the pattern pieces across the fabric this way. I could fit my 5 wedge patterns across 26" - half the width of this decorator fabric - so 10 would fit across one complete width selvage to selvage. If your fabric has no specific pattern you want to match in cutting, then you could cut two layers at a time. But since I wanted (needed!) to match the fabric pattern, I cut each wedge individually. And notice no pins! Freezer paper is fabulous for patterns like this!


Each wedge is backed with a layer of lightweight cotton batting, which means you need to cut 30 pieces of batting using the wedge pattern.  The pattern supply list includes a twin sized batting, but that seems an excessive amount.  I can't say for sure the actual quantity needed since I used my scraps, but it seems to me a throw size (60" square) for the 24" pillow will be sufficient. The lightest weight cotton batting is what you want. Anything with more weight and bulk is going to give you problems sewing. Quilter's Dream Request batting (the blue label) is a good choice.


The batting is basted to each wedge section and then trimmed away to very near the basting stitches - by far the most tedious step of the process. The pillow top and bottom are sewn into three segments of five wedges with all seams pressed in the same direction. Here is one completed segment - 1/3 of the pillow top.


And here is the completed top. That fussy cutting was totally worth the extra time, right?!


The underside of the pillow top shows how the seams all spiral in the same direction. Loops of twill tape are sewn to the center of the top and bottom to achieve the tufting effect. I initially questioned the necessity of this step thinking I could just use a long upholstery needle to attach the buttons at the end after stuffing, but this method is genius.  Do it this way!


A 12" zipper provides the side seam opening for stuffing. Inserting this zipper was easy peasy. I was anticipating much more difficulty because of all the fabric bulk, but it went very smoothly.


Two self-covered 2.5" diameter buttons and 4 pounds of fiberfill stuffing completes the pillow.  None of the local sewing supply shops had this size button kit in stock so I ordered them from amazon.


The medallion motifs were fussy cut from fabric that we used on another pillow - they were the perfect size!


Since this is such a lengthy and photo-heavy post, I'm going to save the details about the other four pillows for the next post.

I hope you all have enjoyed your summer as much as I have - with the exception of the rotary cutter incident of course!  Here's to a great fall season.  Back to school and back to sewing!!

Are there any other Honey Bun Pouf pillow makers out there?

Thursday, September 20, 2012

the new normal

Two weeks ago my husband and I drove Thing 1 - Caroline - far, far away to her first year of college at the Savannah College of Art and Design - SCAD.

For me (and probably my husband and Thing 2), the last several weeks leading up to her departure were full of secret moments of dread and at times, I believed my heart would break wide open at the thought of her being so far away from all of us. After all, who would the three of us be without Caroline here to complete the foursome of us? We are so blessed to have a family that not only loves each other, but genuinely likes each other and spends quite a bit of time together enjoying being together. None of us were able to wrap our brains around how she could be so far apart from us, and yet still keep it all the same.

It isn't the same, but two weeks have passed and I'm happy (and thankful) to report that the three of us here at home are settling into our new "normal", even though we still (and will likely always) miss her like crazy. At home there are still tests to study for, groceries to buy, work days to get through, and even though it seemed unbelievable a few weeks ago - fun things to do. Life goes on. Thank heavens for Skype, unlimited texting, and cell phones!!

Meanwhile down south, Caroline has met so many new friends, loves her classes and roommates and the city of Savannah, and is being challenged creatively every day - exactly what she wanted. We're so proud of her!!

Here are a few shots of her new little corner of the world taken on move-in day...


Our rental van packed full of stuff...


The trip odometer as we pulled into our driveway at home after a whirlwind 102 hours away: 2102 miles and almost 37 hours of driving...


Wednesday, August 22, 2012

Oh, the places she'll go...

We're gearing up for Thing 1's big move south to college in just a couple of weeks! She's got her dorm room assignment, two roommates, class schedule, and now a fully complete bed set! The hand-sewing project I previewed for you in my last post is finished - a toss pillow to coordinate with her quilt...


I used the Clover Yo-Yo Maker Extra Large size to craft 36 yo-yos for the pillow center. They each measure about 2.5" in diameter. You can order one from amazon.com and many other online retailers, but I was lucky enough to find mine at my local JoAnn's store.


The inspiration for this design came during a summer shopping trip where she spied this pillow...


To make this personalized version I chose one of the fabrics used for the block frames in her quilt and added some teal chenille ball fringe to the edges of her 20" finished pillow.


Most of the yo-yo fabrics are found in her quilt, which I'm thrilled to say is also completed! Here's the front. It's so large that even standing on a chair she couldn't hold it up off the ground - 78" wide by 102" long - yikes! (I ended up adding an additional row for those of you who remember reading about my dilemma over making it larger.) That size should provide about 15-18" of overhang on the sides and end of her lofted dorm bed.


For the backing she chose an Amy Butler Daisy Chain print, and I added a 8" wide pieced strip to the center. My original reason for adding the center strip was to avoid purchasing 3 more yards of backing fabric, but I'm so glad I did it this way - much more interesting :) Money saved and better result = win/win!


The quilting was done by my regular long-arm quilter, Carol Linder in Hampshire, IL. My college-bound girl chose an overall loopy, swirly pattern in a medium teal thread - fabulous!


Now all the quilt needs is a fun label for the back. I've got a design drawn out on paper and my Pigma Micron pens ready to go!

Quilt Pattern - Green Glass Door by Blue Underground

Tuesday, May 29, 2012

I'm back!

What a whirlwind of a month it's been! Two major household remodeling projects began at the very tail end of April and just finished on Friday, May 25 at 7:30pm. Then at noon on Saturday, May 26 (that's right, just about 18 hours later) Thing 1 graduated from high school and we had 50+ well-wishers here at the house for a celebration! Whew!

In the midst of all that activity and party preparation I did manage to get a little sewing done. The middle panel of my Tree of Life applique quilt is complete!


It's all needle-turned, so progress is slow; this center panel measures about 36" x 43" and took me 27 months to complete. Notice I stated that time frame the same way you do when you've had a baby and people ask you her age? You get so used to replying, "two months, eleven months, fifteen months" that by the time two years rolls around, you're still stating her age in months. What does that say about this quilt? No idea. I just think it's an interesting observation...

It obviously needs to be pressed and the blue wash-out marker lines need to be washed out, but I'm just so gosh-darn happy to say this section is complete! Four borders to go - hopefully that won't take another 27 months!

Here are a few close-ups of the individual branch segments...


This one is my favorite. I love the little purple worm and the dotted pot - both Kaffe fabrics. In fact, there are quite a few Kaffe fabrics in these little bits of applique. One of the reasons I love it so much and I've stuck with it for over two years!


In closing, here's a photo of my family with the new grad, Thing 1, in the center. It was a marvelous day with fabulous weather enjoyed in the company of many great friends and almost all our loving family members. It simply could not have been better :)


Wednesday, May 2, 2012

college quilt top completed

The quilt top for my college-bound girl is complete! She laid out all the blocks to her liking, and I think she did a fabulous job evenly balancing the lights and darks.


The pattern is "Green Glass Door" by Blue Underground. The finished size of this quilt is 78" x 87" which I thought was big enough for a dorm-sized bed. But I've just learned that dorm beds are 80" long! So I think we're going to add a 7" or 8" strip to the top edge of the quilt to add some needed length. Maybe a near solid in a darker teal, or a strip of a bigger patterned print bordered by some 1.5" width strips like all the blocks. I don't think either will look too out of place, since the top will be covered by a pillow most of the time, but if you've got a different idea let me know ASAP!


There are lots of Amy Butler prints from a few of her fabric lines in this quilt - Daisy Chain, Midwest Modern 2, and Lark. Also a little Joel Dewberry Modern Meadows, and of course Kaffe - shot cottons and prints. A nicely blended hodgepodge of teal and turquoise :)

I'm sending it out to be quilted - this thing seems huge to me! It's the largest quilt I've made to date. As I was crawling around on the floor pinning the last long seam I thought to myself, "this is why you haven't made a king-sized quilt for your own bed!"

It definitely needs a name. So far I'm drawing a blank...

Thursday, August 25, 2011

Thing 1 summer sewing recap

I just realized that my post from earlier today was not only incorrect in it's title (Thing 2), but it also left out a key bit of information: All the items shown in the photos were sewn by my eldest - Thing 1.

If you didn't read the earlier post, here are all the photos and pattern numbers again. So you don't feel like you missed anything :) If you didn't read it, then it's all new to you anyhow!

McCall's 6400 - top


McCall's 6113 - dress


McCall's 5591 - skirt


Simplicity 2413 - skirt (Project Runway !!)


Not sure of the pattern for the eggplant dress modeled by Thing 1. Venus (de Milo - the dressmaker dummy - so named for her missing head) is modeling a free-form "maybe" creation.


Smile pillows that reside in Thing 2's bedroom. Because she does smile... all the time :)


Thing 1 has some fun things planned for this fall as well, thanks to a trip to Vogue Fabrics last weekend!

Thursday, July 8, 2010

the sweatshop is OPEN

Since my sewing room was moved upstairs from the basement last fall, I have made an important discovery... it gets very HOT in a second floor, west-facing room with lots of task-lighting, an iron and two sewing machines running! My 13 year old daughter has her sewing machine set up across the table from mine and we have been busy.

Last summer she decided to launch a bag-making business, and she has taken and filled several orders since then. Most recently she made this Amy Butler Frenchy bag (the smaller version) that her aunt ordered...

She also whipped up this Terry Atkinson "Zippy Strippy" cosmetic bag for herself and plans to make several more as Christmas gifts for friends.

Thanks to my outstanding nephew, she also has a website under development: http://www.daisydesignsbynatalie.com/.

My eldest daughter participated in a summer fashion design program last month at a nearby college. For one week they held a mini "Project Runway" with each student designing a red-carpet dress for Scarlett Johanssen (sp?). Two designs were chosen by the faculty, and then two teams of 9 students created patterns, cut, and sewed the dresses for a portfolio show held on the weekend. Caroline's design was not chosen, but she did a LOT of the sewing on this dress...

I surely wish that I could hear what Elsie has to say about these two wonderful girls of mine! I am so proud of them!!
And now we've got to figure out how to get a third machine into that sewing room, because none of us wants to be left out when the creativity is flowing. I think we're going to need a bigger room... and an auxiliary air-conditioner :)

LinkWithin

Related Posts Plugin for WordPress, Blogger...