Pages

Friday, April 26, 2013

the Liverpool Tunic

It's finished and looks exactly as I'd hoped!


I ended up cutting the entire garment on the XS lines, and though there are a few things I will tweak the next time I make it (yes - I'm going to do it again!) it fits very well for a first-time-through go at a commercial pattern. How's that for luck?


Things I will tweak next time:
  • Amy's not big on trimming seams, and that is a must-do with this pattern - especially the collar stand.  I've made a note to trim the collar, shoulder/arm, side and sleeve seams.  She tells you to zigzag stitch or serge the edges, but not trim.  Go figure...
  • The bust darts need to be moved up about 1/2" - 3/4".
  • Leave the belt off.  The torso is fitted enough that it's not necessary, and it only adds a big knot in the middle of my back when I sit.
  • Maybe forget about the cuff buttons for the 3/4 sleeve length option.  I don't think they are a really noticeable feature for all the extra work required, and the cuffs aren't that big around to begin with.
  • I'm going to find some decorative buttons for the front.  The self-covered ones are okay, but I can still see a hint of their metallic shine through the fabric.  I thought of interfacing the button fabric first, but I think that would be too bulky.  Anyone else ever tried that or have a better solution?
  • The buttonholes and buttons need to be moved up (toward the collar) about an inch.  They're right on the line of acceptable now without wearing a cami underneath.  I should have tested that before I sewed and cut the buttonholes... live and learn.

I'm planning to use this fabric for my next Liverpool Tunic: Sketchbook in Spring from Amy Butler's Alchemy line.  Very spring-like, huh?


This pattern would also be very cute made up into a long-sleeved fall season tunic of fine wale corduroy or a velvet to pair with leggings. It comes with markings for short, 3/4 and long sleeves, as well as overall length options for shirt, tunic, short dress, and long dress.

An update on Miss Scarlett - sadly, she can never be my exact body double. Her neck and shoulders are a bit too thick and are not adjustable. But the rest of her is adjusted properly and works just fine for skirts :)

Wednesday, April 24, 2013

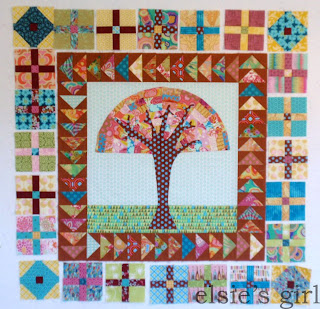
border challenge 2 ready

My border challenge class meets again tonight, and my homework is done just in time. I have never changed my mind about a quilting project so many times as I have in the last few weeks regarding this...


This month our assignment included three parameters. My border must include this color...


The charm square is the actual color sample I received, and the fabric beneath it is what I chose to match it. It isn't exact, but close enough. The method the instructor used to assign our color was a bit cruel. She had a charm pack of near solid, tone-on-tone prints; we were instructed to pass it around and choose our favorite from the bunch. I selected a lovely lavender/rose color that I knew would coordinate nicely with the other fabrics I had already used in the center and first border. But of course that would have been too easy - once we had all picked a color we were instructed to pass it one seat to the left!  That's how I ended up with this burgundy color.

The second requirement we were all given was to include a shoo-fly block somewhere within the second border. This was again determined by one of the students choosing a random number that corresponded to a page in a book of quilt blocks.

Lastly, we all "counted off" into four groups and were assigned a shape to incorporate independent of the shoo-fly block.  My group got "squares" while others were given circles, triangles, or rectangles.

I knew I could live with the color assignment since we can use as much or as little as we want within the border, so I set about trying to sketch some color and block options...


I decided on this non-traditional placement of fabrics for the shoo-fly block based on a modern quilt image I found on Pinterest.


My original plan was to alternate the burgundy and teal 6" blocks for the entire border, but I really disliked that look. The scale was too big and the coloring was all wrong...


Then I settled on a smaller 5" shoo-fly block for just the corners, and used a very similar nine-patch variation for all the other blocks. This way I could incorporate many of the same colors I had already used, but still meet all three requirements: burgundy color, shoo-fly block, and squares. Woo-hoo! This is the part of the border I'm really happy about.


But I felt like something was needed to separate the flying geese from this border, and I could quite find the right fabric. I love this yellow print, but no. And the teal solid is nice too, but again, no...


Maybe the brown/blue spot from the tree trunk?  Still not quite right...


I finally landed on this Paperweight print from Kaffe in Leafy. I'm not completely convinced that it's the best choice, but I'm counting on being able to repeat it again later to tie it in better. It does draw out the grass green in the center and highlight the greens in my flying geese. But as I look back through these photos, maybe I didn't really need anything to separate the two? I don't know.


Another thing I'm second-guessing is leaving out a small burgundy cornerstone where the green borders meet. Probably should have done that...


It does make me smile that the border is a little diary of some of my favorite fabrics. You can see the Emerald Kite Tails backing from my Twinkle quilt above, as well as some wine bottles and bookshelves from a recent line of "Grand Tour" prints from David textiles.

And below you can see some small bits from the Amy Butler tunic I just finished (a full report on that later) and the teal flowers leftover from my daughter's college quilt.


My homework isn't 100% complete though. I'm planning to add a final border (1" - 1.5") of the burgundy to the outside edge to "seal off" these blocks before adding the third border. But I've got to get some more of the burgundy. I guess a half-yard isn't always enough!

If you've read all the way to the end, congratulations! This is a particularly wordy post, but I wanted to document all the pondering and deciding and undoing it took to get to this point. I'm not loving it yet, but one of the main reasons I took this class was to break out of my comfort zone and challenge myself to be more fearless with color and patterns. Whew... only three more borders to go!

Oh, and it's up to 41" square now. 


Saturday, April 20, 2013

Twinkle finished!

I've checked one more item off the UFO list - my Twinkle quilt!


In my last post about this quilt I mentioned that I was a bit hesitant about my choice of magenta thread for the machine quilting. But I think it was a great choice! It isn't as obvious in the darker blocks, but in the lighter ones it really stands out and looks fabulous...


The quilting pattern is an overall swirl - a different one than I've used before, but I'll definitely use it again. I do love a swirly quilting pattern :) Carol Linder in Hampshire did the long arm quilting for me.


The binding fabric is the same as the star points: Art Gallery Oval Elements in Mood Indigo.


The backing (the whole nine yards of it!) is Kaffe's Kite Tails in Emerald - the Pantone color of 2013. I know, I'm so on trend, right?


I want to always remember that my friend, Sharon, gave me all of the luscious fabrics for the quilt front, so I put her name right on the label...


I brought the quilt last week to my Crystal Lake Modern Quilt Guild meeting for show and tell. Here I am reading the label to Sharon...


And this was her reaction :)


That leaves only 6 items on my "Group A - Almost Done! Really Want to Finish!" UFO list.

27 total UFOs, but still, WOO-HOO!!

Quilt stats:
Pattern - Twinkle by Cheryl Wittmayer
28 blocks at 14" square
84" x 98" finished size
Warm and Natural batting
Star points - Oval Elements Mood Indigo
Star Centers - Kaffe Fassett Shot Cotton in Apple
Block Fabrics - 168 unique fabrics from Kaffe Collective, Anna Maria Horner, and Amy Butler
Backing: Kaffe Kite Tails in Emerald


Friday, April 5, 2013

adventures in garment fitting

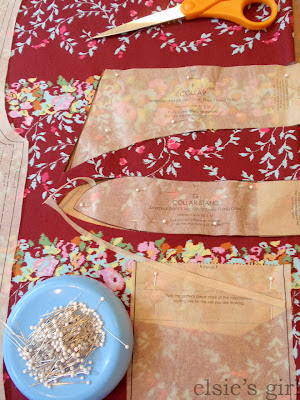
This week I began working on a new apparel sewing project...


The Liverpool Tunic pattern from Amy Butler. Included with the pattern are four hem length and four sleeve length options. I am making the tunic length with 3/4 cuffed sleeves - as shown in the photo on the pattern front. The fabric I chose is from Amy's Alchemy line - Victoriana in Port. I particularly like the spring flower colors against the wine colored background. It should be perfect with jeans!


This is Miss Scarlett. She is my body double; a Christmas gift from my dear husband. On Christmas Day we adjusted all her dials to conform to my particular measurements, and then she stood sentinel in the sewing room until this week when she was called up for active duty - actual garment fitting!


The multitude of measurement charts on the pattern back indicated that I am a size extra-small from the shoulders to the waist, and a size small from the waist down. No problem - I adjusted by cutting accordingly and happily began sewing away. Fast forward to step 6 in the pattern construction directions, and I've got two tunic fronts and one tunic back all full of completed darts and I'm ready to close up shop for the night.

I think, "I'll just pin these pieces to Miss Scarlett and get an idea of how fabulous this garment is going to look when finished!"


But they don't fit - the bodice is too small!! Arrggghhhh!

Now it's time to make dinner, and I'm fuming about how I've wasted all this time and money on a garment that I won't even be able to button! I should have made a muslin first!


The back panel is stretched so tight across both the waist and shoulder areas...


And the front panels are waaaay too tight across the bust. After a very brief mental hissy-fit, I convinced myself that I could let out the darts a bit and take 1/4" instead of 1/2" seams all around, and maybe it would be okay. Tomorrow.


The next morning I'm ready to tackle these fit issues, and I try the pinned garment on myself. Well, what do you know?! It actually fits me! And the bottom half is actually a bit too big. Oh, happy day - I haven't wasted time and money, and I will be able to wear this!

Lesson learned here: After adjusting your dress form to your measurements, take an actual tape measure and confirm that the dress form is in fact your body double. That and yeah, I probably should have made a muslin first.

Miss Scarlett is NOT my body double. But she will be after her dials are re-adjusted, and she then endures a very thorough measuring session. We girls just love measuring sessions, don't we?

Tuesday, April 2, 2013

thank you quilt for Lynn

Happy April everyone! The last two weeks have been filled with spring break fun for me as first my college girl was home for a week long visit, and then Thing 2 had her break from school. If only both school breaks had aligned in the same week! But the four of us still managed to spend a lot of time together :)

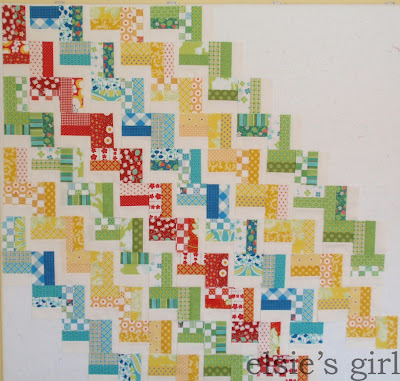
I intended to keep this quilt a surprise for my friend, Lynn, but I just had to give her some sneak peeks. She designed the logo for our new Crystal Lake Modern Quilt Guild early this year, and to thank her Paige and I decided to make a lap quilt. Lynn requested a zig-zag or chevron pattern using the same colors in the Fiestaware pillow I made for her in 2011.


We decided on something similar to this quilt by Rita at Red Pepper Quilts. I cut about 30 strips each of red, green, yellow, and blue fabrics, and 60 strips of Kona snow all measuring 2" x 22" and sewed them in sets of three - two colored and one Kona strip in each set.


Those 60 strip sets measuring 5" x 22" were then each cut into 4 segments measuring 5" square.


After the blocks were arranged in the zig-zag pattern on my design wall, the rest was easy! It took a bit of time to get all those rows sewn together, but I think she's gonna love it!


Block size is 4.5" finished. The finished quilt will measure 63" x 67.5" with 14 blocks across and 15 blocks down.

My job making the top is now done, so I'm handing it off to Paige for quilting on her long-arm machine. After some red dot binding is added it will be headed to Lynn's home. Maybe. It's really turned out well, and it might be quite difficult to actually give it away!! This pattern would be a great use of strip scraps, so I'll likely make another one. Maybe one with a dark solid instead of the Kona snow?

LinkWithin

Related Posts Plugin for WordPress, Blogger...